linux:
ip -6 neighbour
Windows:
netsh interface ipv6 show neighbors
华为路由器:
display ipv6 neighbour
Views: 46
linux:
ip -6 neighbour
Windows:
netsh interface ipv6 show neighbors
华为路由器:
display ipv6 neighbour
Views: 46
IPv6中广泛使用组播地址,很多时候要查看组播地址
Windows:
netsh interface ipv6 show joins
Linux:
ip -6 maddress
华为路由器:
display ipv6 interface
Views: 12
sudo -u nobody php --define apc.enable_cli=1 /var/www/nextcloud/updater/updater.phar
nobody是nexcloud的运行帐户,选择命令行升级主要是因为Web界面上升级失几率太高了,主要是下载慢,长时任务时Web界面就会卡住。
更新应用
sudo -u nobody php occ app:update --all
Views: 13
原本是能开启4096QAM的,但是固件升级到R23版本以后就降到1024QAM了。
# 配置性能模式
ssid-profile name ssid1
service-guarantee performance-first
quit
# 强制使用802.11ax
radio-5g-profile name default
radio-type dot11ax
Views: 20
vap-profile-name default
undo learn-client-address ipv4 disable
执行以上命令开启地址学习后可以通过display station all看到终端的ipv4地址,但是到第二天所有终端都断网了,查看发现dhcp无法获取ip地址。
反复测试发现开启地址学习后会自动开启dhcp snooping(dhcp snooping enable),但是关闭地址学习后并不会关闭dhcp snooping。而且没有任何提示说这两条命令会连带执行或有依懒关系。
解决方法:
1. 同时关闭地址学习和dhcp snooping功能
2. 同时开启地址学习和dhcp snooping功能,但要要ap的上联口设置dhcp snooping trusted
3. 使用AC+Fit AP,在AC上不会自动打开dhcp snooping
Views: 21
这个主要是缓解镜外访问慢的问题
Views: 10
Views: 9
Views: 8
本文翻译自 2020 年的一篇英文博客: How NAT traversal works。
设想这样一个问题:在北京和上海各有一台局域网的机器(例如一台是家里的台式机,一 台是连接到星巴克 WiFi 的笔记本),二者都是私网 IP 地址,但可以访问公网, 如何让这两台机器通信呢?
既然二者都能访问公网,那最简单的方式当然是在公网上架设一个中继服务器: 两台机器分别连接到中继服务,后者完成双向转发。这种方式显然有很大的性能开销,而 且中继服务器很容易成为瓶颈。
有没有办法不用中继,让两台机器直接通信呢?
如果有一定的网络和协议基础,就会明白这事儿是可能的。Tailscale 的这篇史诗级长文由浅入深地展示了这种“可能”,如果完全实现本文所 介绍的技术,你将得到一个企业级的 NAT/防火墙穿透工具。 此外,如作者所说,去中心化软件领域中的许多有趣想法,简化之后其实都变成了 跨过公网(互联网)实现端到端直连 这一问题,因此本文的意义并不仅限于 NAT 穿透本身。
由于译者水平有限,本文不免存在遗漏或错误之处。如有疑问,请查阅原文。
以下是译文。
在前一篇文章 How Tailscale Works 中, 我们已经用较长篇幅介绍了 Tailscale 是如何工作的。但其中并没有详细描述我们是 如何穿透 NAT 设备,从而实现终端设备直连的 —— 不管这些终端之间 有什么设备(防火墙、NAT 等),以及有多少设备。本文试图补足这一内容。
全球 IPv4 地址早已不够用,因此人们发明了 NAT(网络地址转换)来缓解这个问题。
简单来说,大部分机器都使用私有 IP 地址,如果它们需要访问公网服务,那么,
整个过程对双方透明。
更多关于 NAT 的内容,可参考 (译) NAT – 网络地址转换(2016)。 译注。
以上是本文所讨论问题的基本背景。
在以上所描述的 NAT 背景下,我们从最简单的问题开始:如何在两台经过 NAT 的机器之间建立 点对点连接(直连)。如下图所示:
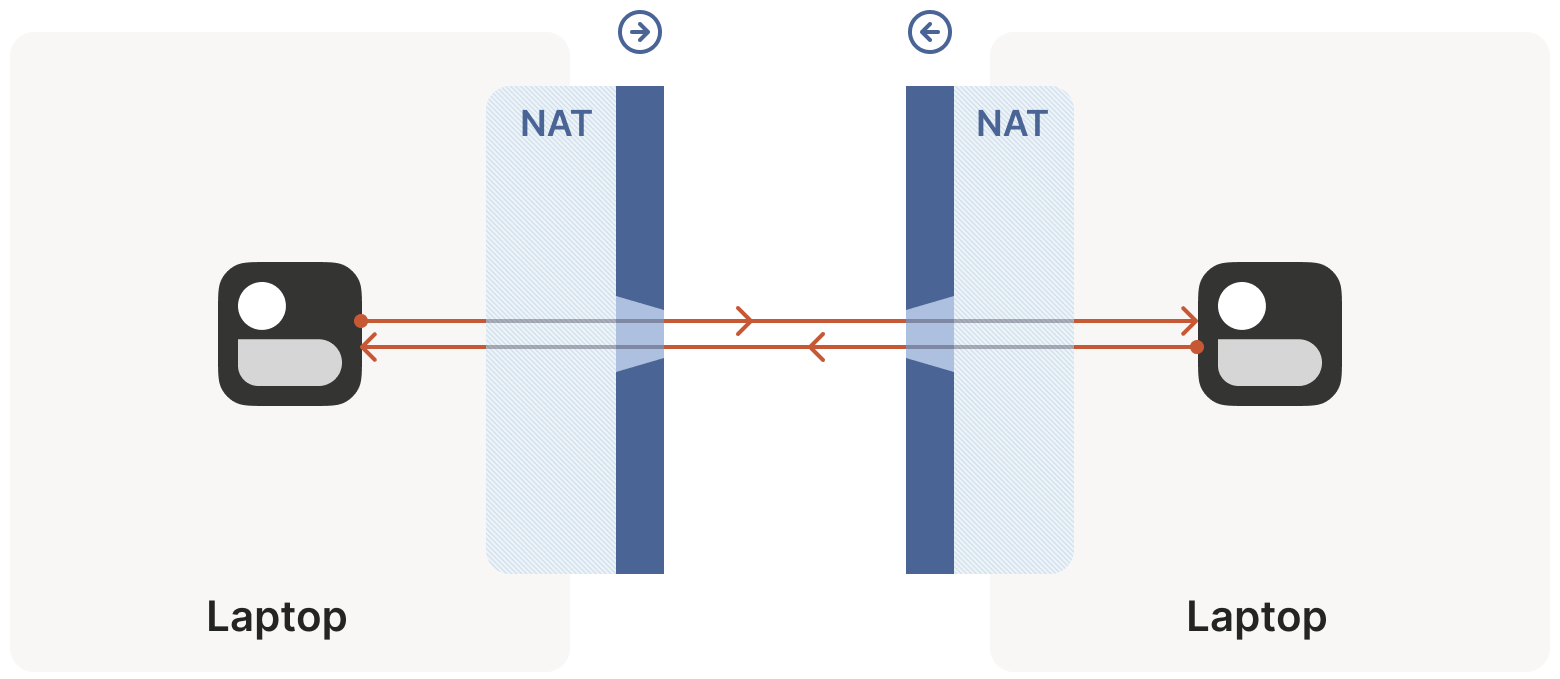
直接用机器的 IP 互连显然是不行的,因为它们都是私有 IP(例如 192.168.1.x)。 在 Tailscale 中,我们会建立一个 WireGuard® 隧道 来解决这个问题 —— 但这并不是太重要,因为我们将过去几代人努力都整合到了一个工具集, 这些技术广泛适用于各种场景。例如,
接下来,本文将在一般意义上讨论这些技术,并在合适的地方拿 Tailscale 和其他一些东西作为例子。
如果想设计自己的协议来实现 NAT 穿透,那必须满足以下两个条件:
理论上用 TCP 也能实现,但它会给本已相当复杂的问题再增加一层复杂性, 甚至还需要定制化内核 —— 取决于你想实现到什么程度。本文接下来都将关注在 UDP 上。
如果考虑 TCP 是想在 NAT 穿透时获得面向流的连接( stream-oriented connection),可以考虑用 QUIC 来替代,它构 建在 UDP 之上,因此我们能将关注点放在 UDP NAT 穿透,而仍然能获得一个 很好的流协议(stream protocol)。
例如,从经验上来说,无法基于某个现有的网络库实现 NAT 穿透,因为我们 必须在使用的“主要”协议之外,发送和接收额外的数据包。
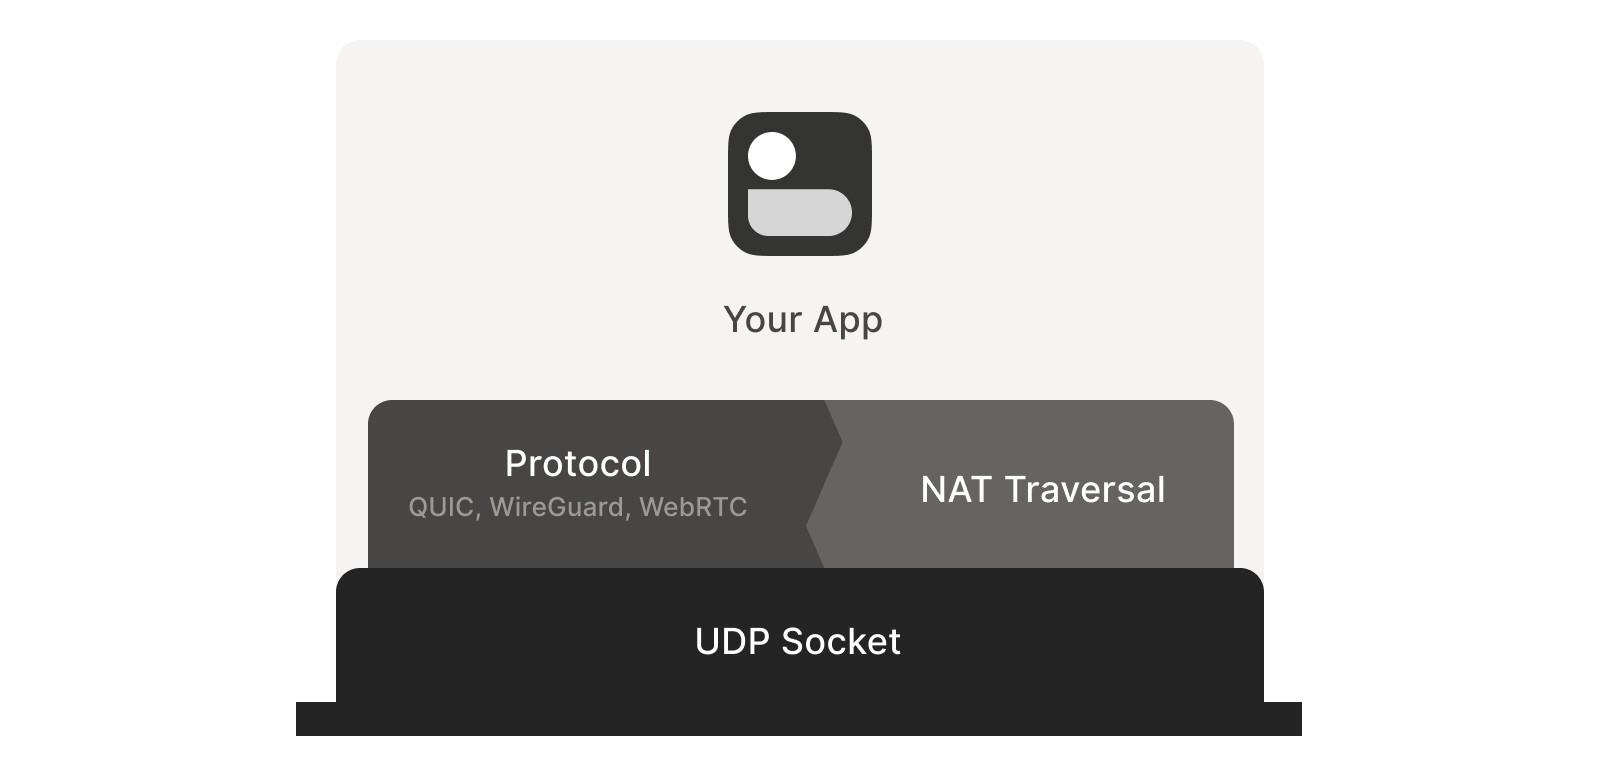
某些协议(例如 WebRTC)将 NAT 穿透与其他部分紧密集成。但如果你在构建自己的协议, 建议将 NAT 穿透作为一个独立实体,与主协议并行运行,二者仅 仅是共享 socket 的关系,如下图所示,这将带来很大帮助:
在某些场景中,直接访问 socket 这一条件可能很难满足。
退而求其次的一个方式是设置一个 local proxy(本地代理),主协议与这个 proxy 通信 ,后者来完成 NAT 穿透,将包中继(relay)给对端。这种方式增加了一个额外的间接层 ,但好处是:
有了以上铺垫,下面就从最基本的原则开始,一步步看如何实现一个企业级的 NAT 穿透方案。
我们的目标是:在两个设备之间通过 UDP 实现双向通信, 有了这个基础,上层的其他协议(WireGuard, QUIC, WebRTC 等)就能做一些更酷的事情。
但即便这个看似最基本的功能,在实现上也要解决两个障碍:
有状态防火墙是以上两个问题中相对比较容易解决的。实际上,大部分 NAT 设备都自带了一个有状态防火墙, 因此要解决第二个问题,必须先解决有第一个问题。
有状态防火墙具体有很多种类型,有些你可能见过:
pf以上防火墙的配置都是很灵活的,但大部分配置默认都是如下行为:
可能有少量例外规则,例如 allowing inbound SSH。
连接(connection)和方向(direction)都是协议设计者头脑中的概念,到了 物理传输层,每个连接都是双向的;允许所有的包双向传输。 那防火墙是如何区分哪些是入向包、哪些是出向包的呢? 这就要回到“有状态”(stateful)这三个字了:有状态防火墙会记录它 看到的每个包,当收到下一个包时,会利用这些信息(状态)来判断应该做什么。
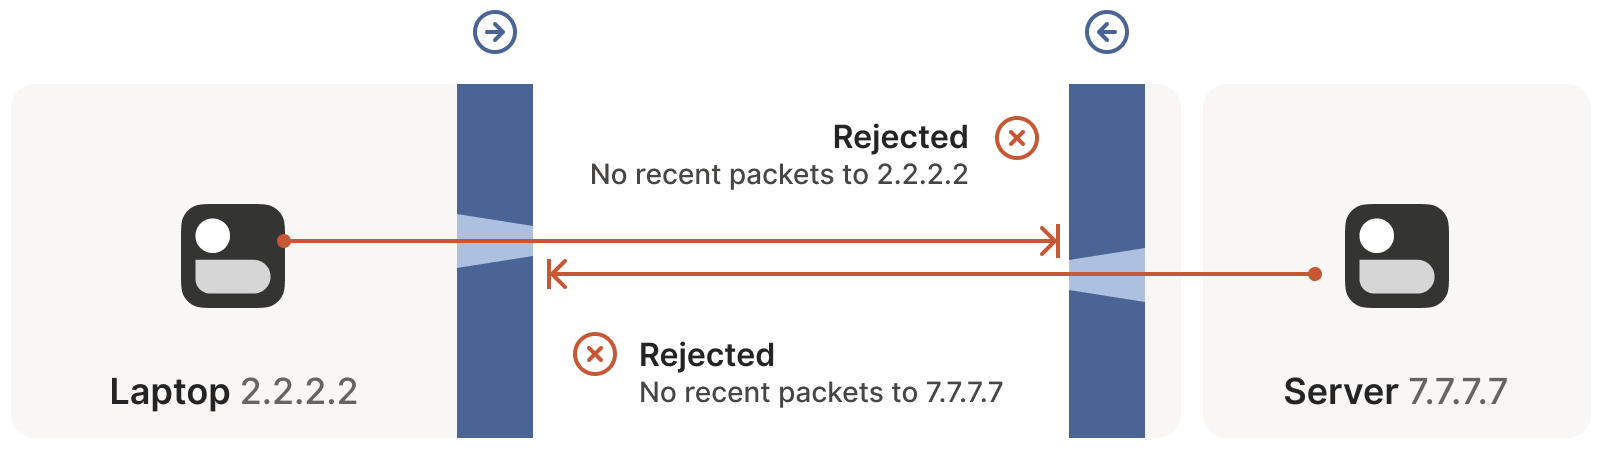
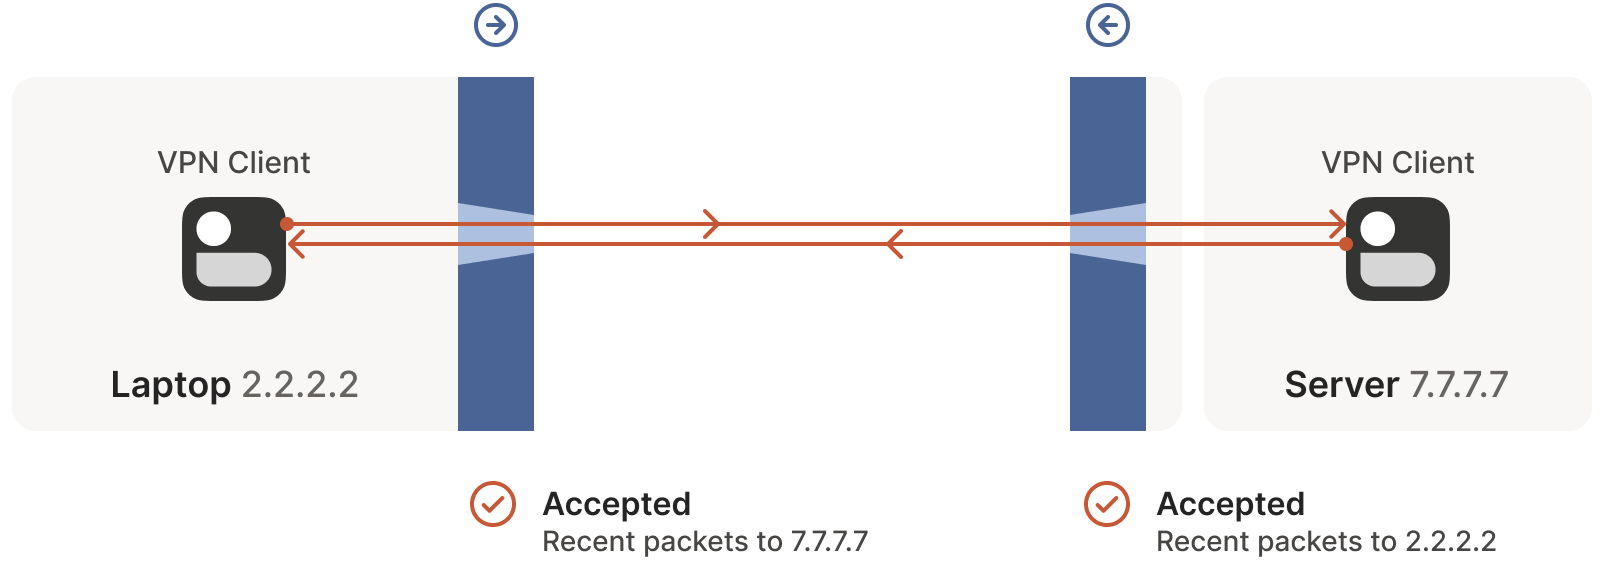
对 UDP 来说,规则很简单:如果防火墙之前看到过一个出向包(outbound),就会允许 相应的入向包(inbound)通过,以下图为例:
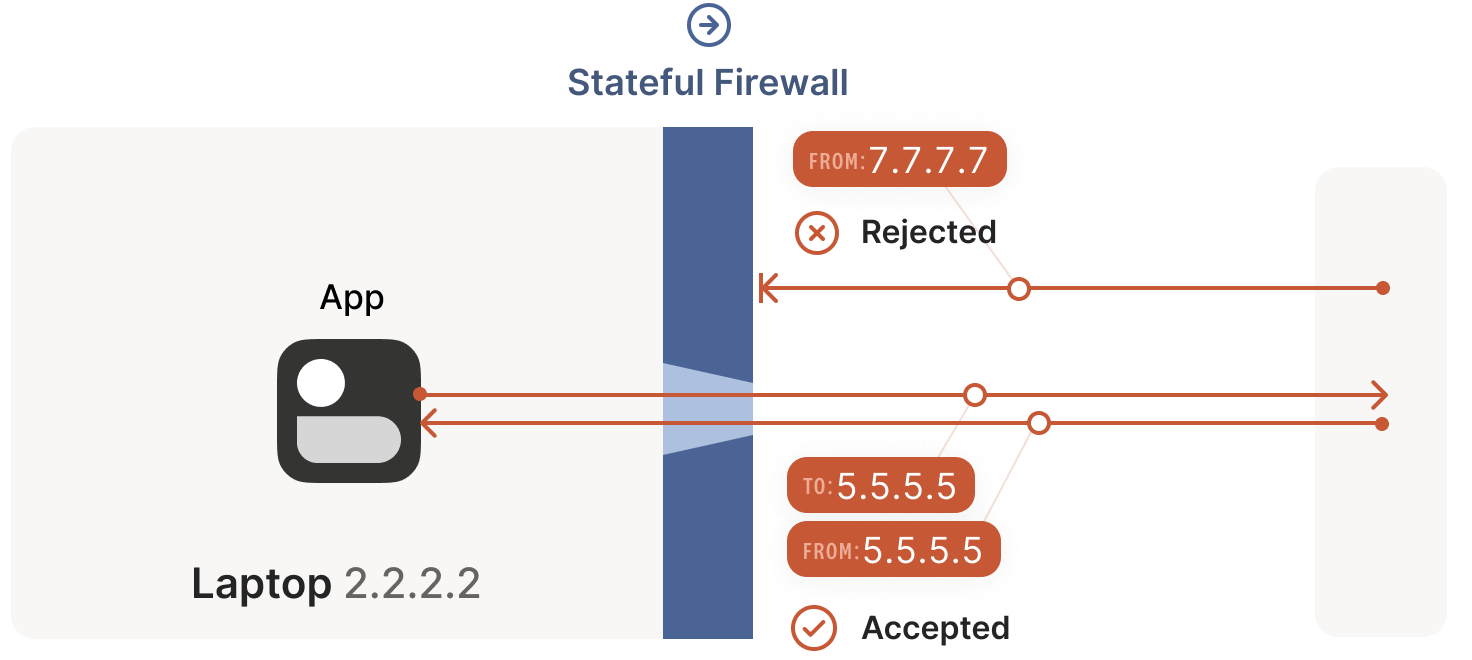
笔记本电脑中自带了一个防火墙,当该防火墙看到从这台机器出去的 2.2.2.2:1234 -> 5.5.5.5:5678 包时,就会记录一下:5.5.5.5:5678 -> 2.2.2.2:1234 入向包应该放行。 这里的逻辑是:我们信任的世界(即笔记本)想主动与 5.5.5.5:5678 通信,因此应该放行(allow)其回包路径。
某些非常宽松的防火墙只要看到有从
2.2.2.2:1234出去的包,就 会允许所有从外部进入2.2.2.2:1234的流量。这种防火墙对我们的 NAT 穿透来说非 常友好,但已经越来越少见了。
在 NAT 穿透场景中,以上默认规则对 UDP 流量的影响不大 —— 只要路径上所有防火墙的“朝向”是一样的。 一般来说,从内网访问公网上的某个服务器都属于这种情况。
我们唯一的要求是:连接必须是由防火墙后面的机器发起的。这是因为 在它主动和别人通信之前,没人能主动和它通信,如下图所示:
但上图是假设了通信双方中,其中一端(服务端)是能直接访问到的。 在 VPN 场景中,这就形成了所谓的 hub-and-spoke 拓扑:中心的 hub 没有任何防火墙策略,谁都能访问到; 防火墙后面的 spokes 连接到 hub。如下图所示:
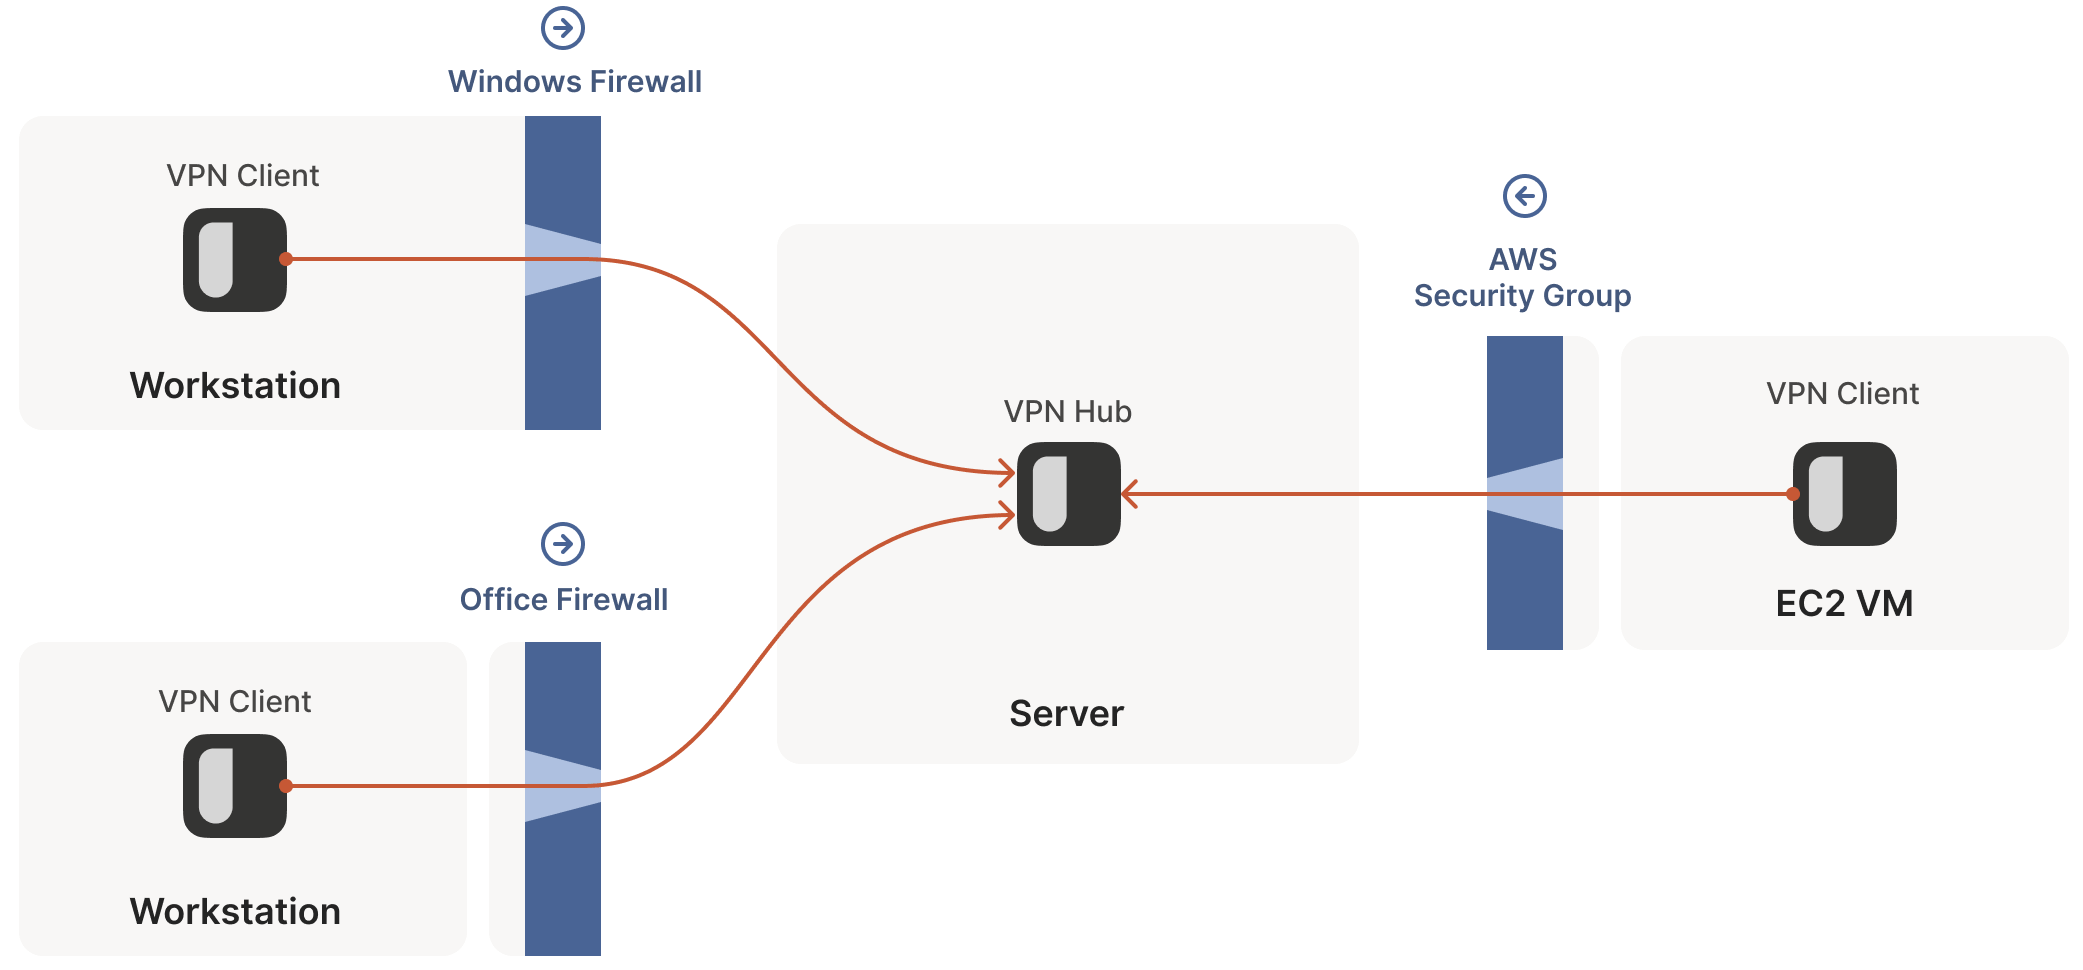
但如果两个“客户端”想直连,以上方式就不行了,此时两边的防火墙相向而立,如下图所示:
根据前面的讨论,这种情况意味着:两边要同时发起连接请求,但也意味着 两边都无法发起有效请求,因为对方先发起请求才能在它的防火墙上打开一条缝让我们进去! 如何破解这个问题呢?一种方式是让用户重新配置一边或两边的防火墙,打开一个端口, 允许对方的流量进来。
因此,我们需要寻找一种不用重新配置防火墙的方式。
解决的思路还是先重新审视前面提到的有状态防火墙规则:
因此,要穿透这些有状态防火墙,我们只需要共享一些信息:让两端提前知道对方使用的 ip:port:
ip:port 信息。有了对方的 ip:port 信息之后,两端开始给对方发送 UDP 包。在这个过程中,我们预 料到某些包将会被丢弃。因此,双方必须要接受某些包会丢失的事实, 因此如果是重要信息,你必须自己准备好重传。对 UDP 来说丢包是可接受的,但这里尤其需要接受。
来看一下具体建连(穿透)过程:
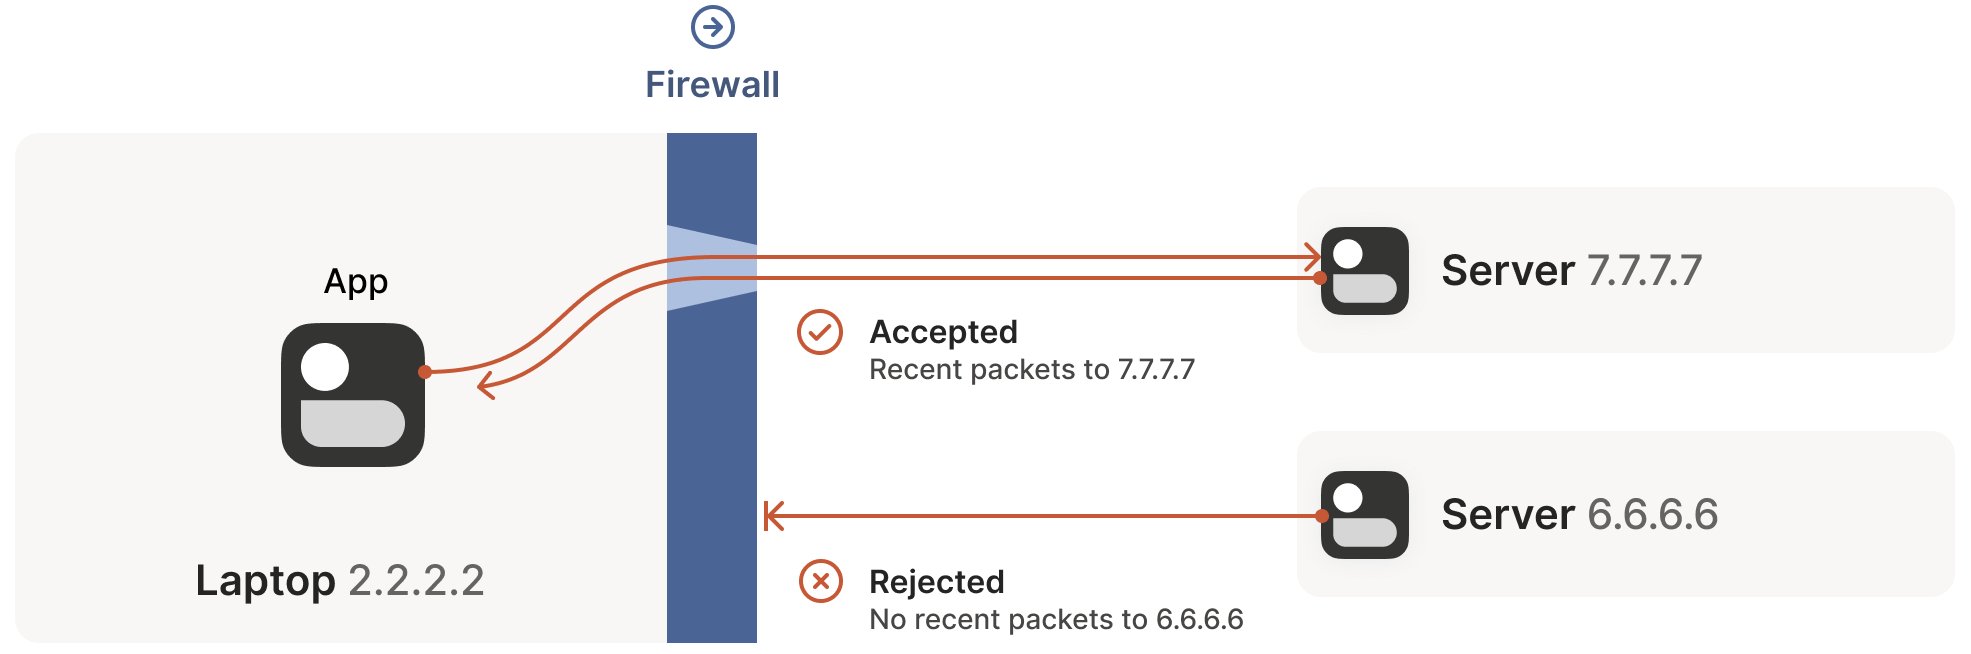
2.2.2.2:1234 -> 7.7.7.7:5678,穿过 Windows Defender 防火墙进入到公网。
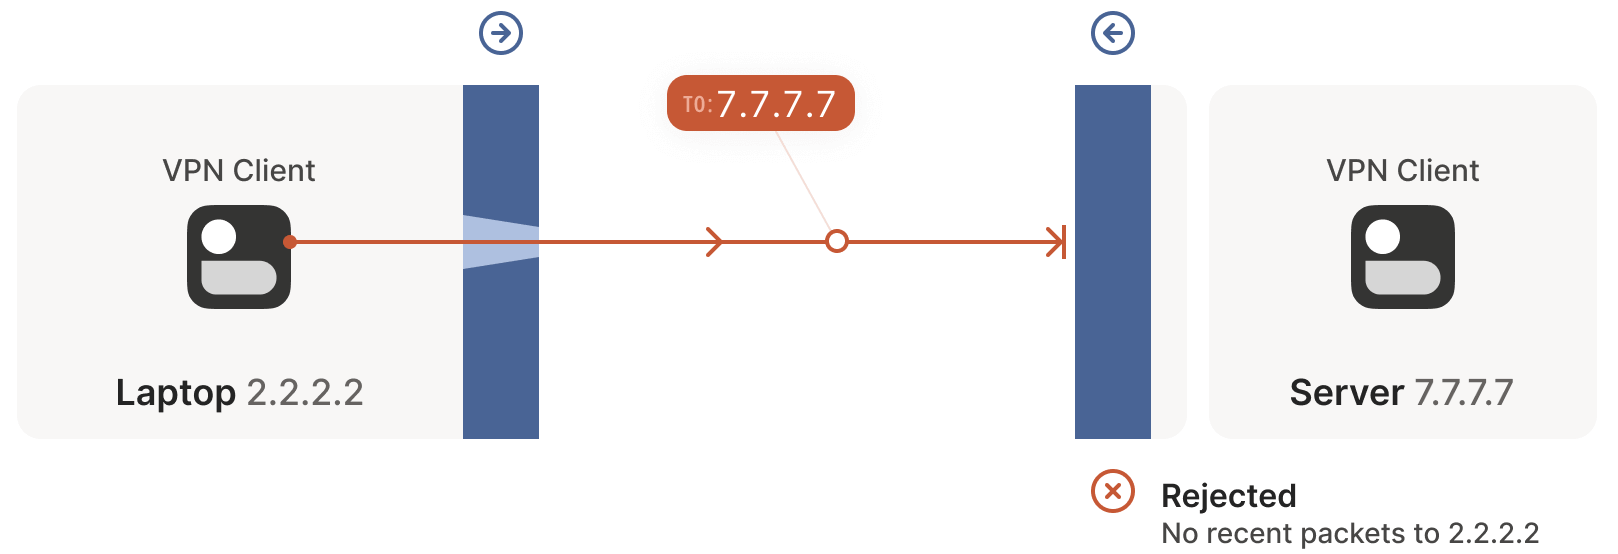
对方的防火墙会将这个包拦截掉,因为它没有 7.7.7.7:5678 -> 2.2.2.2:1234 的流量记录。 但另一方面,Windows Defender 此时已经记录了出向连接,因此会允许 7.7.7.7:5678 -> 2.2.2.2:1234 的应答包进来。
7.7.7.7:5678 -> 2.2.2.2:1234 穿过它自己的防火墙到达公网。
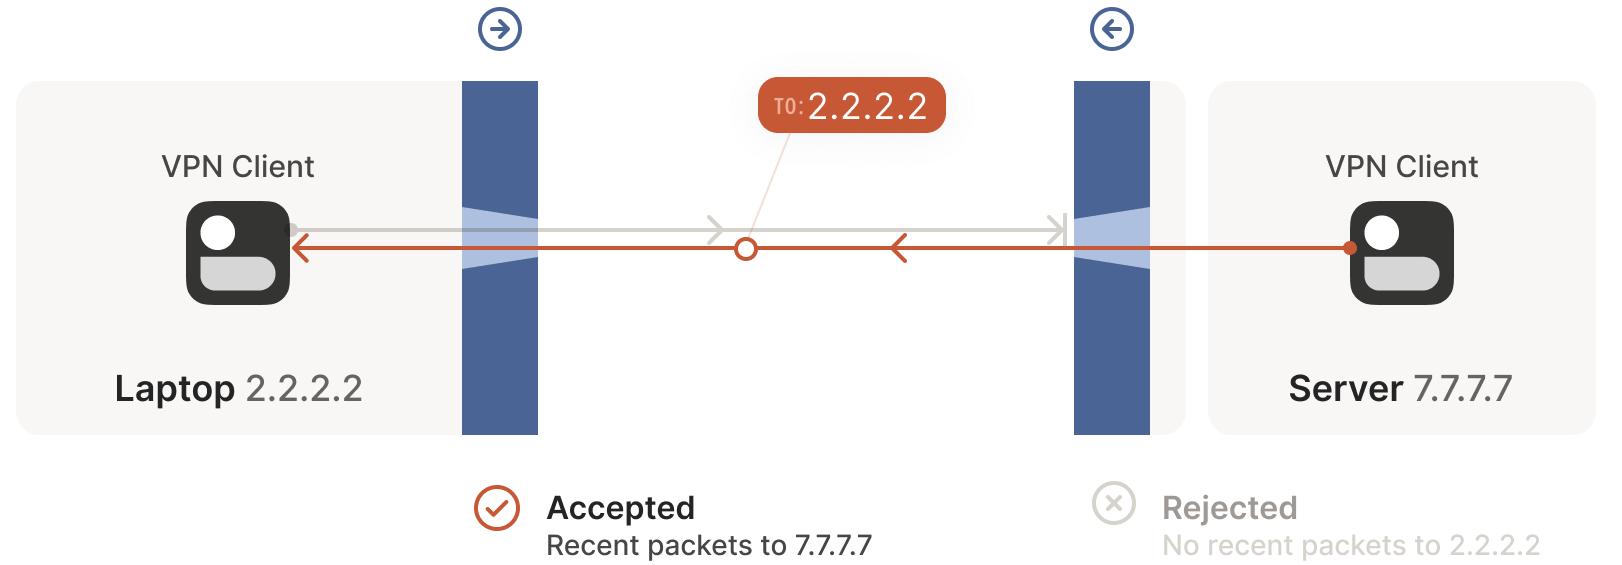
到达客户端侧时,Windows Defender 认为这是刚才出向包的应答包,因此就放行它进入了! 此外,右侧的防火墙此时也记录了:2.2.2.2:1234 -> 7.7.7.7:5678 的包应该放行。
成功!这样我们就建立了一个穿透两个相向防火墙的双向通信连接。 而初看之下,这项任务似乎是不可能完成的。
穿透防火墙并非永远这么轻松,有时会受一些第三方系统的间接影响,需要仔细处理。 那穿透防火墙需要注意什么呢?重要的一点是:通信双方必须几乎同时发起通信, 这样才能在路径上的防火墙打开一条缝,而且两端还都是活着的。
如何实现“同时”呢?一种方式是两端不断重试,但显然这种方式很浪费资源。假如双方都 知道何时开始建连就好了。
有状态防火墙内存通常比较有限,因此会定期清理不活跃的连接(UDP 常见的是 30s), 因此要保持连接 alive 的话需要定期通信,否则就会被防火墙关闭,为避免这个问题, 我们,
对于防火墙穿透来说, 我们并不需要关心路径上有几堵墙 —— 只要它们是有状态防火墙且允许出 向连接,这种同时发包(simultaneous transmission)机制就能穿透任意多层防火墙。 这一点对我们来说非常友好,因为只需要实现一个逻辑,然后能适用于任何地方了。
…对吗?
其实,不完全对。这个机制有效的前提是:我们能提前知道对方的 ip:port。 而这就涉及到了我们今天的主题:NAT,它会使前面我们刚获得的一点满足感顿时消失。
下面,进入本文正题。
可以认为 NAT 设备是一个增强版的有状态防火墙,虽然它的增强功能 对于本文场景来说并不受欢迎:除了前面提到的有状态拦截/放行功能之外,它们还会在数据包经过时修改这些包。
具体来说,NAT 设备能完成某种类型的网络地址转换,例如,替换源或目的 IP 地址或端口。
SNAT 最常见的使用场景是将很多设备连接到公网,而只使用少数几个公网 IP。 例如对于消费级路由器,会将所有设备的(私有) IP 地址映射为单个连接到公网的 IP 地址。
这种方式存在的意义是:我们有远多于可用公网 IP 数量的设备需要连接到公网,(至少 对 IPv4 来说如此,IPv6 的情况后面会讨论)。NAT 使多个设备能共享同一 IP 地址,因 此即使面临 IPv4 地址短缺的问题,我们仍然能不断扩张互联网的规模。
假设你的笔记本连接到家里的 WiFi,下面看一下它连接到公网某个服务器时的情形:
192.168.0.20:1234 -> 7.7.7.7:5678。
这一步就好像笔记本有一个公网 IP 一样,但源地址 192.168.0.20 是私有地址, 只能出现在私有网络,公网不认,收到这样的包时它不知道如何应答。
包经过路由器时,路由器发现这是一个它没有见过的新会话(session)。 它知道 192.168.0.20 是私有 IP,公网无法给这样的地址回包,但它有办法解决:
2.2.2.2:4242,192.168.0.20:1234 <--> 2.2.2.2:4242,2.2.2.2:4242 而不是原来的 192.168.0.20:1234。因此服务端看到的是转换之后地址,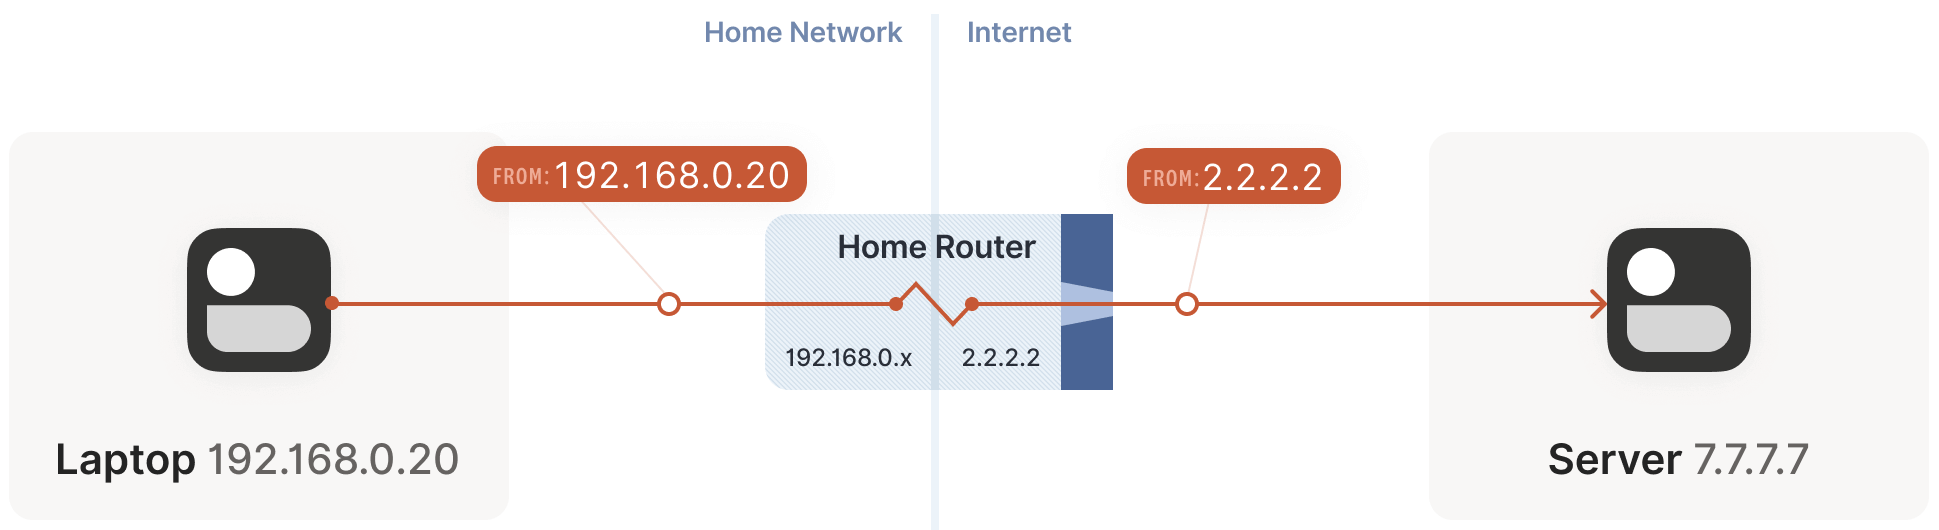
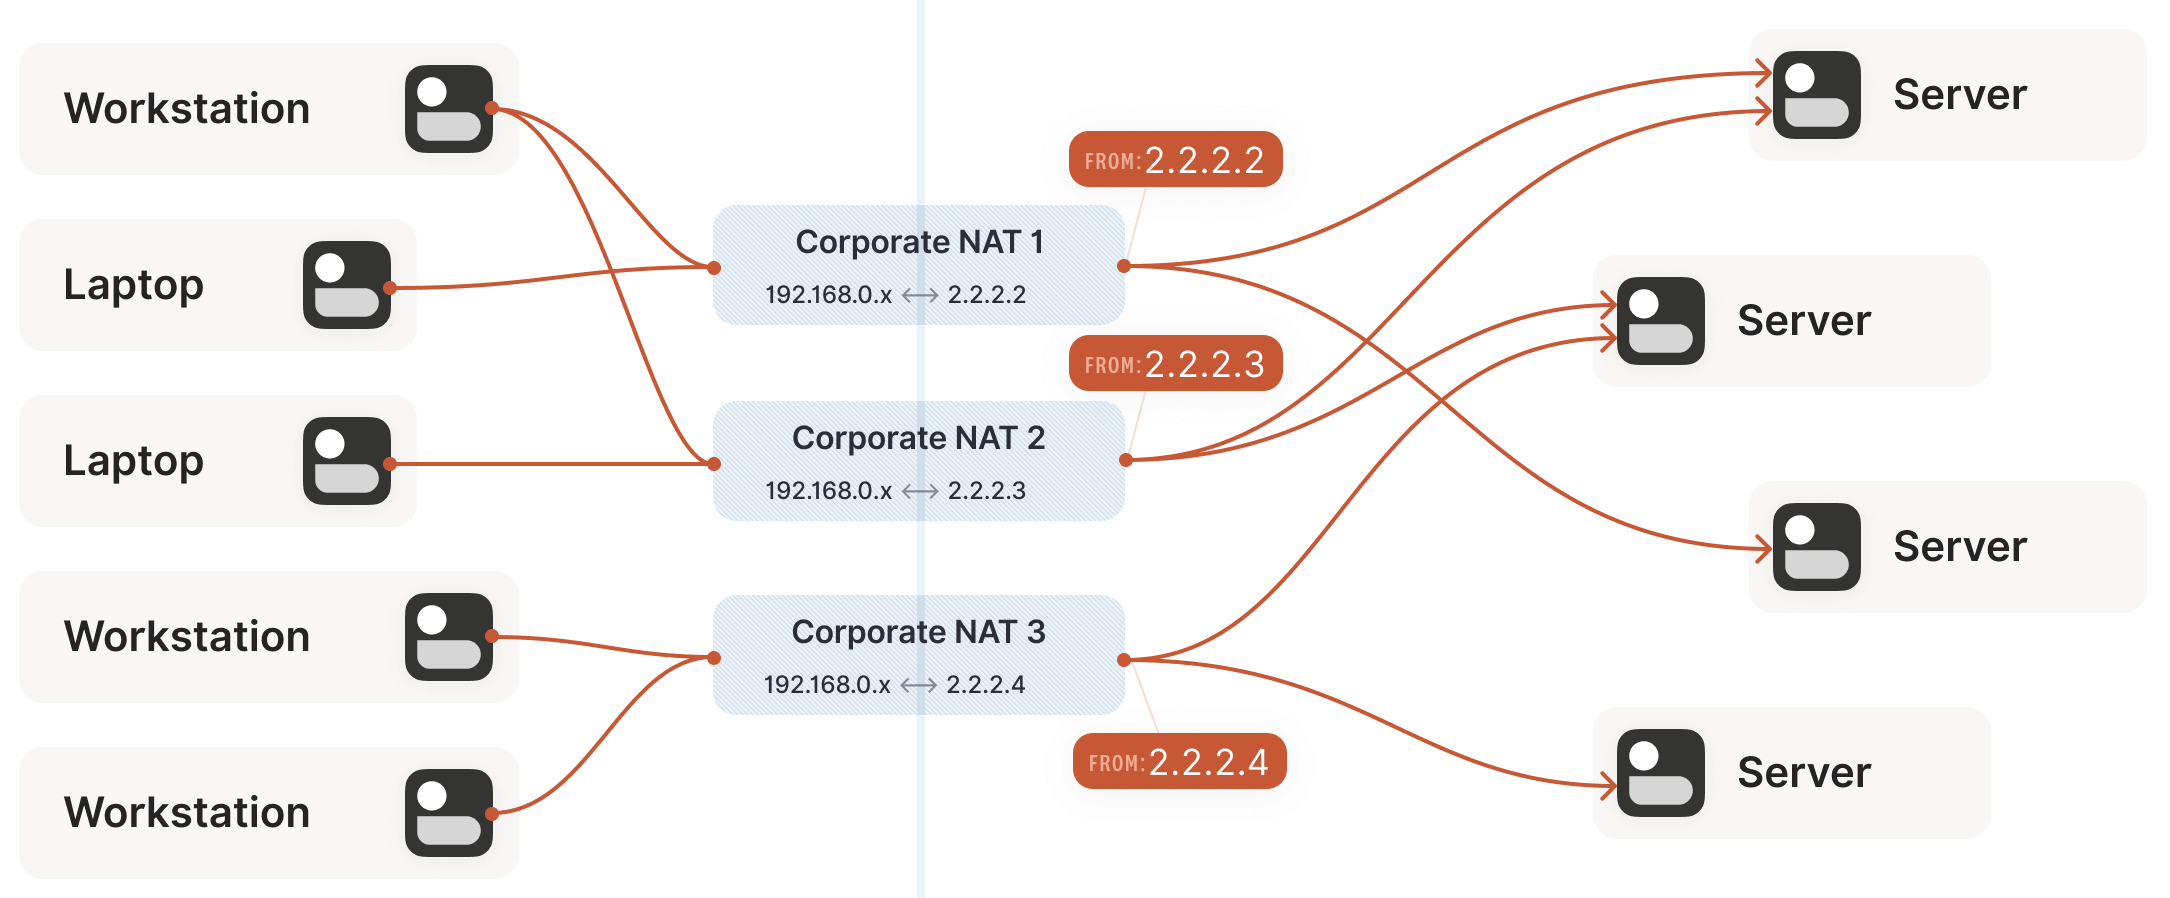
2.2.2.2:4242 变回 192.168.0.20:1234。对于笔记本来说,它根本感知不知道这正反两次变换过程。这里是拿家用路由器作为例子,但办公网的原理是一样的。不同之处在 于,办公网的 NAT 可能有多台设备组成(高可用、容量等目的),而且它们有不止一个公 网 IP 地址可用,因此在选择可用的公网 ip:port 来做映射时,选择空间更大,能支持 更多客户端。
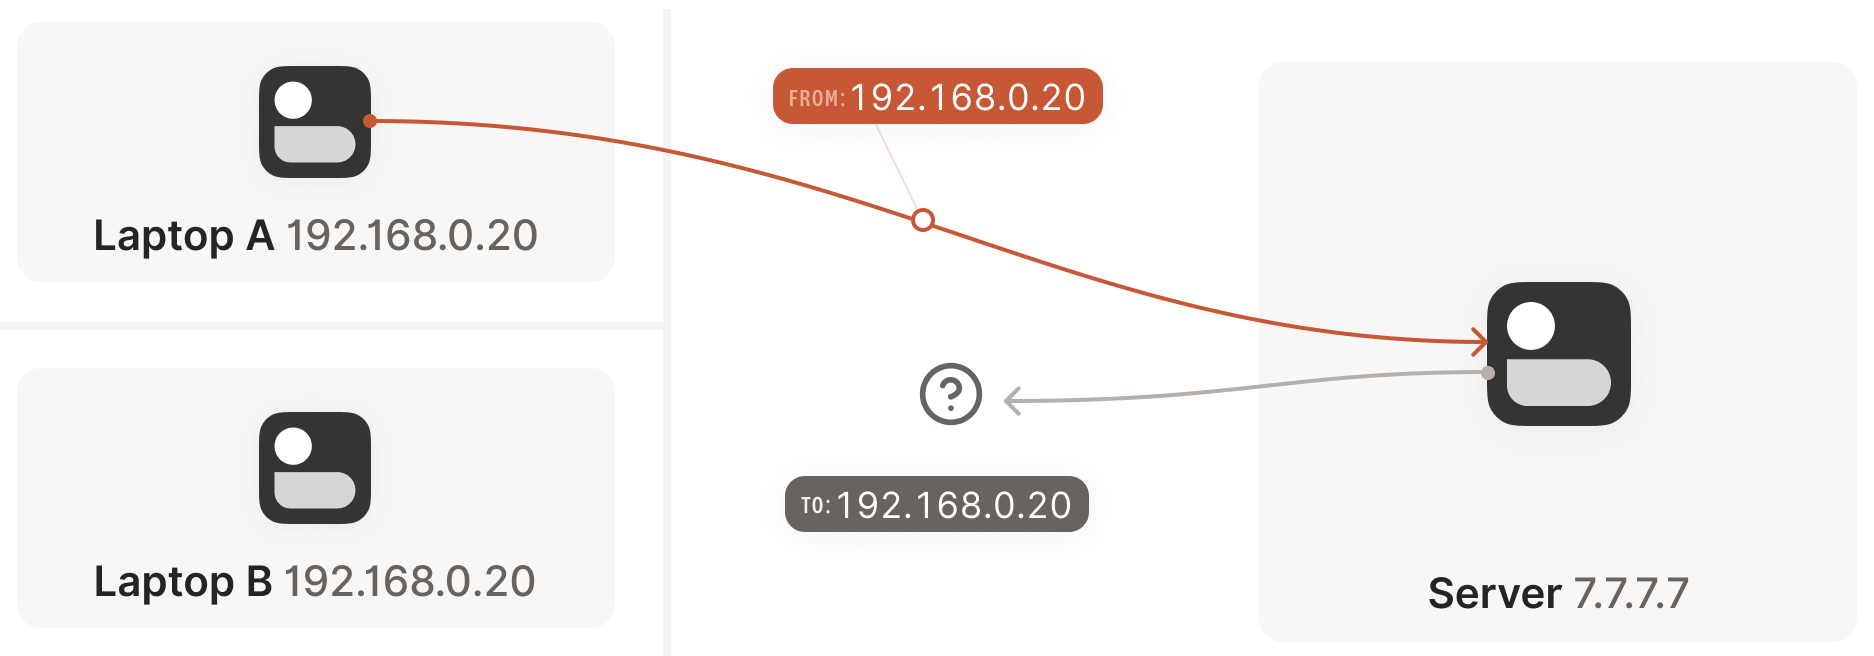
现在我们遇到了与前面有状态防火墙类似的情况,但这次是 NAT 设备:通信双方 不知道对方的 ip:port 是什么,因此无法主动建连,如下图所示:
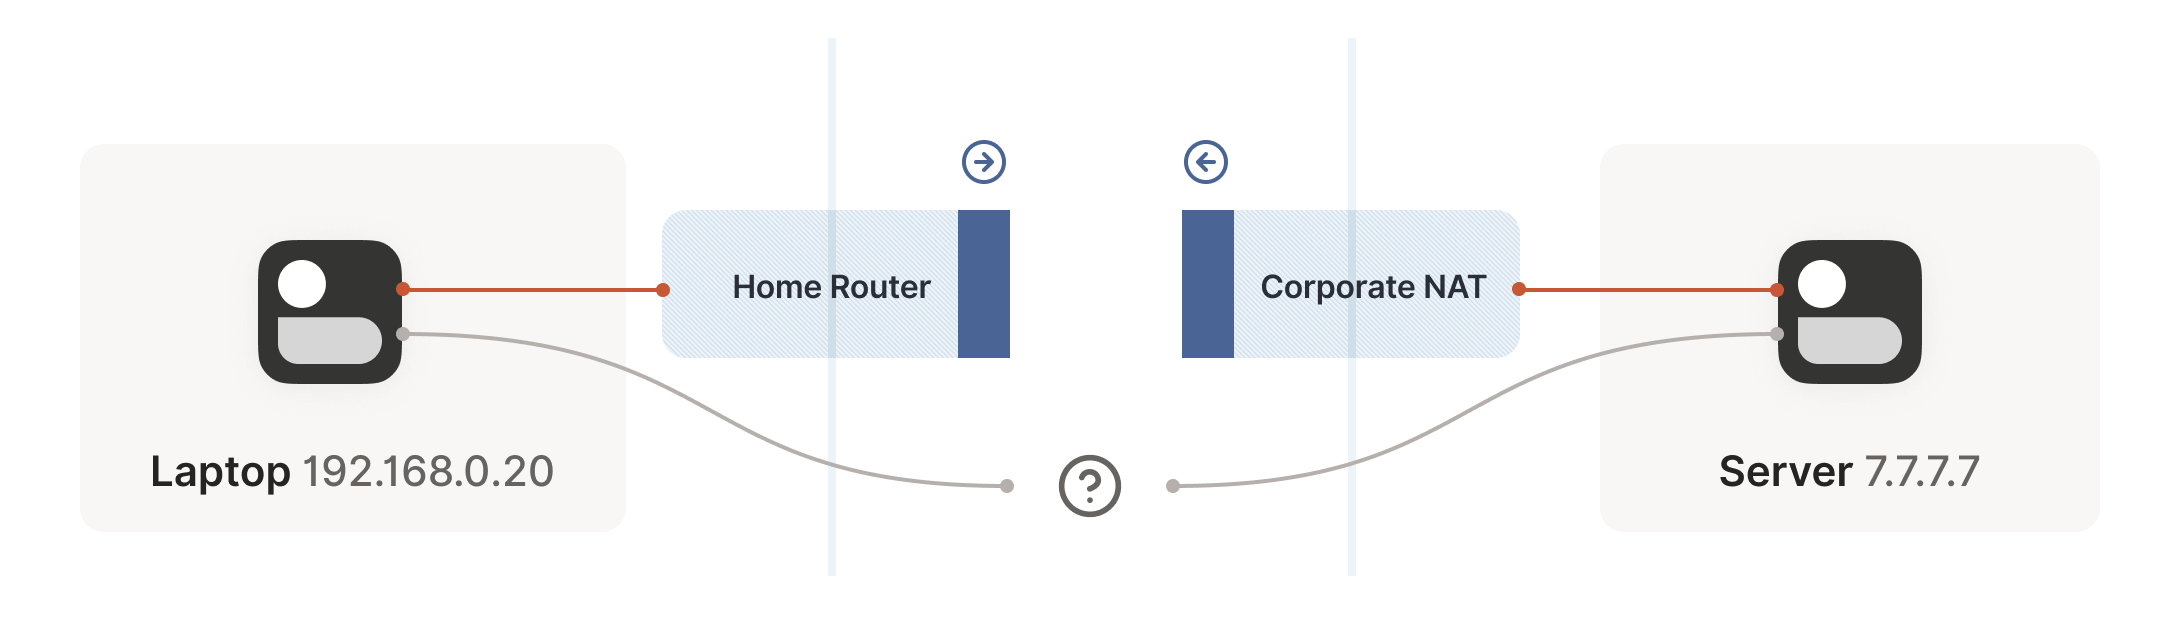
但这次比有状态防火墙更糟糕,严格来说,在双方发包之前,根本无法确定(自己及对方的)ip:port 信息,因为 只有出向包经过路由器之后才会产生 NAT mapping(即,可以被对方连接的 ip:port 信息)。
因此我们又回到了与防火墙遇到的问题,并且情况更糟糕:双方都需要主动和对 方建连,但又不知道对方的公网地址是多少,只有当对方先说话之后,我们才能拿到它的地址信息。
如何破解以上死锁呢?这就轮到 STUN 登场了。
STUN 既是一些对 NAT 设备行为的详细研究,也是一种协助 NAT 穿透的协议。本文主要关注 STUN 协议。
STUN 基于一个简单的观察:从一个会被 NAT 的客户端访问公网服务器时, 服务器看到的是 NAT 设备的公网 ip:port 地址,而非该 客户端的局域网 ip:port 地址。
也就是说,服务器能告诉客户端它看到的客户端的 ip:port 是什么。 因此,只要将这个信息以某种方式告诉通信对端(peer),后者就知道该和哪个地址建连了! 这样就又简化为前面的防火墙穿透问题了。
本质上这就是 STUN 协议的工作原理,如下图所示:
ip:port”。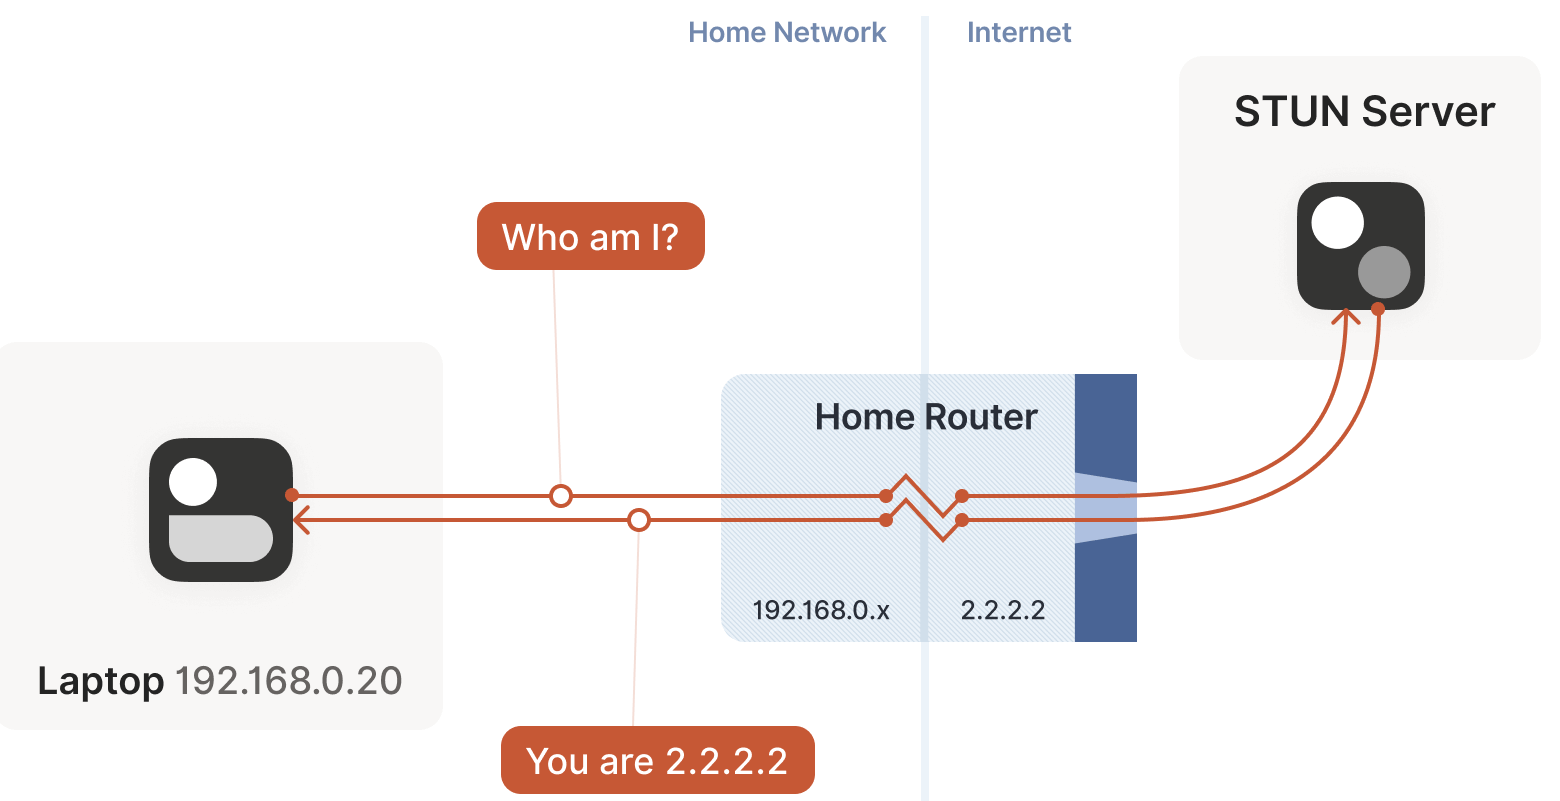
The STUN protocol has a bunch more stuff in it — there’s a way of obfuscating the
ip:portin the response to stop really broken NATs from mangling the packet’s payload, and a whole authentication mechanism that only really gets used by TURN and ICE, sibling protocols to STUN that we’ll talk about in a bit. We can ignore all of that stuff for address discovery.
理解了 STUN 原理,也就能理解为什么我们在文章开头说,如果 要实现自己的 NAT 穿透逻辑和主协议,就必须让二者共享同一个 socket:
有了 STUN,我们的穿透目的似乎已经实现了:每台机器都通过 STUN 来获取自己的私网 socket 对应的公网 ip:port,然后把这个信息告诉对端,然后两端 同时发起穿透防火墙的尝试,后面的过程就和上一节介绍的防火墙穿透一样了,对吗?
答案是:看情况。某些情况下确实如此,但有些情况下却不行。通常来说,
NAT 设备的说明书上越强调它的安全性,STUN 方式失败的可能性就越高。(但注意,从实际意义上来说, NAT 设备在任何方面都并不会增强网络的安全性,但这不是本文重点,因此不展开。)
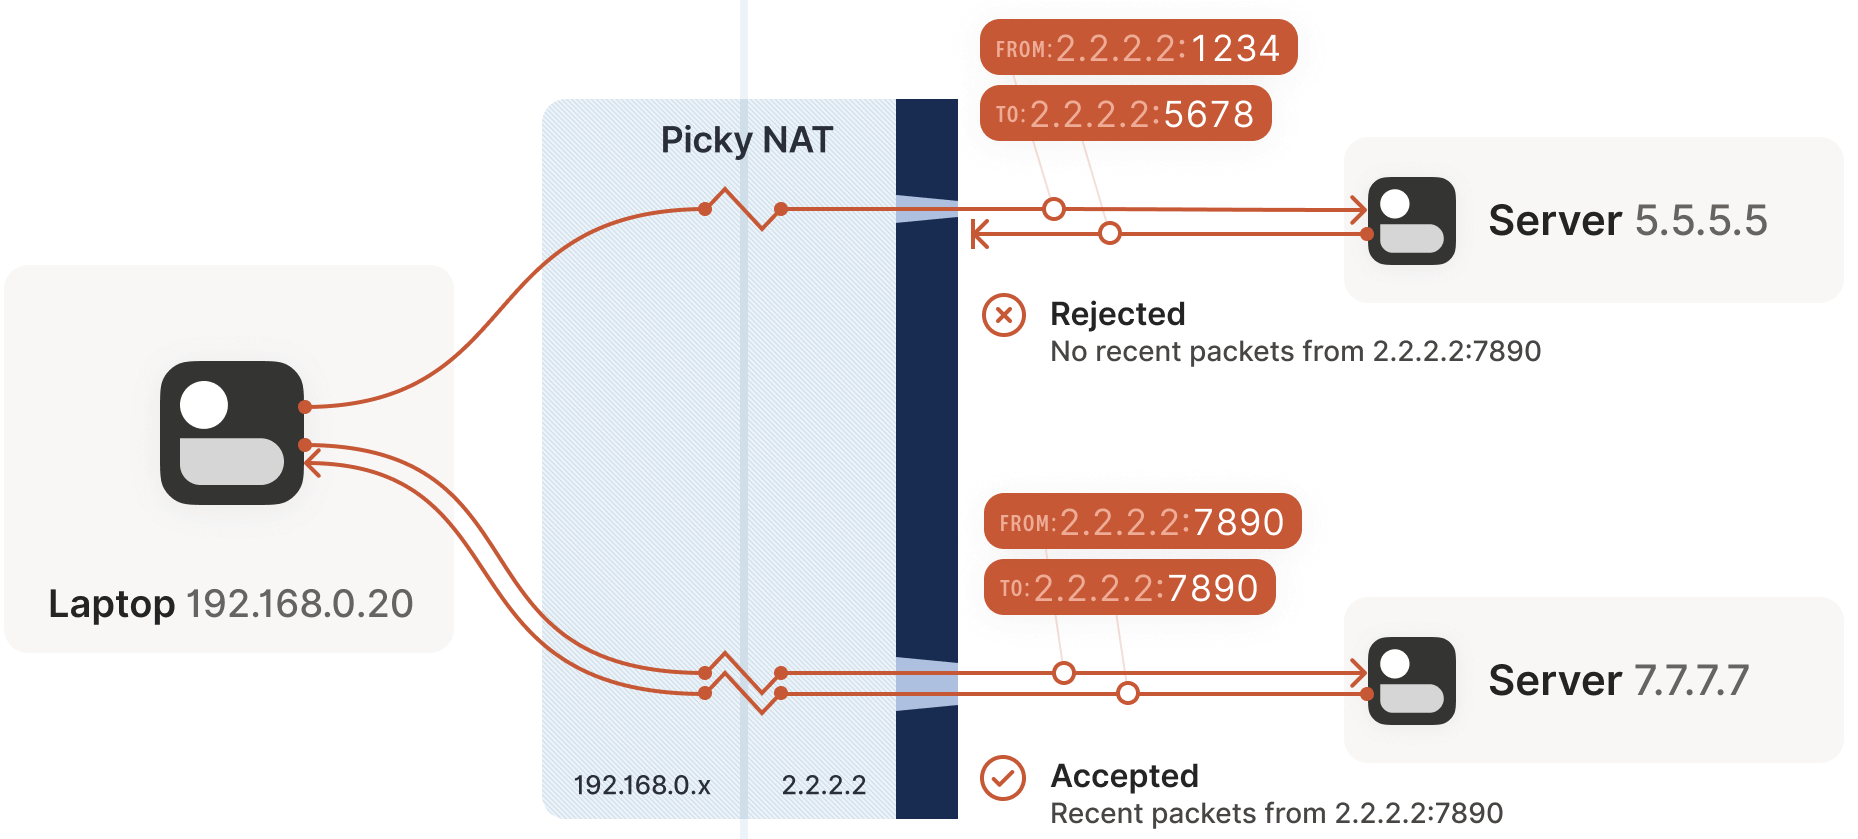
再次审视前面关于 STUN 的假设:当 STUN 服务器告诉客户端在公网看来它的地址是 2.2.2.2:4242 时,那所有目的地址是 2.2.2.2:4242 的包就都能穿透防火墙到达该客户端。
这也正是问题所在:这一点并不总是成立。
in theory, there are also NAT devices that are super relaxed, and don’t ship with stateful firewall stuff at all. In those, you don’t even need simultaneous transmission, the STUN request gives you an internet
ip:portthat anyone can connect to with no further ceremony. If such devices do still exist, they’re increasingly rare.
5.5.5.5:1234 and 7.7.7.7:2345,我们就会得到 2.2.2.2 上的两个不同的端口,每个目的地址对应一个。 如果反向包的端口用的不对,包就无法通过防火墙。如下图所示:
知道 NAT 设备的行为并不是完全一样之后,我们来引入一些正式术语。
如果之前接触过 NAT 穿透,可能会听说过下面这些名词:
这些都是 NAT 穿透领域的早期术语。
但其实这些术语相当让人困惑。我每次都要 查一下 Restricted Cone NAT 是什么意思。从实际经验来看,我并不是唯一对此感到困惑的人。 例如,如今互联网上将 “easy” NAT 归类为 Full Cone,而实际上它们更应该归类为 Port-Restricted Cone。
最近的一些研究和 RFC 已经提出了一些更准确的术语。
前面提到的所谓 “easy” 和 “hard” NAT,只在一个维度有不同:NAT 映射是否考虑到目的地址信息。 RFC 4787 中,
但是,从“命名很难”这一程序员界的伟大传统来说,EIM 这个词其实 也并不是 100% 准确,因为这种 NAT 仍然依赖 endpoint,只不过依赖的是源 endpoint:每个 source ip:port 对应一个映射 —— 否则你的包就会和别人的包混在一起,导致混乱。
严格来说,EIM 应该称为 “Destination Endpoint Independent Mapping” (DEIM?), 但这个名字太拗口了,而且按照惯例,Endpoint 永远指的是 Destination Endpoint。
EDM 中还有一个子类型,依据是只根据 dst_ip 做映射,还是根据 dst_ip + dst_port 做映射。 对于 NAT 穿透来说,这种区分对来说是一样的:它们都会导致 STUN 方式不可用。
你可能会有疑问:根据是否依赖 endpoint 这一条件,只能组合出两种可能,那为什么传 统分类中会有四种 cone 类型呢?答案是 cone 包含了两个正交维度的 NAT 行为:
因此最终组合如下:
NAT Cone Types
| Endpoint 无关 NAT mapping | Endpoint 相关 NAT mapping (all types) | |
|---|---|---|
| Endpoint 无关防火墙 | Full Cone NAT | N/A* |
| Endpoint 相关防火墙 (dst. IP only) | Restricted Cone NAT | N/A* |
| Endpoint 相关防火墙 (dst. IP+port) | Port-Restricted Cone NAT | Symmetric NAT |
分解到这种程度之后就可以看出,cone 类型对 NAT 穿透场景来说并没有什么意义。 我们关心的只有一点:是否是 Symmetric —— 换句话说,一个 NAT 设备是 EIM 还是 EDM 类型的。
以上讨论可知,虽然理解防火墙的具体行为很重要,但对于编写 NAT 穿透代码来说,这一点并不重要。 我们的两端同时发包方式(simultaneous transmission trick)能 有效穿透以上三种类型的防火墙。在真实场景中, 我们主要在处理的是 IP-and-port endpoint-dependent 防火墙。
因此,对于实际 NAT 穿透实现,我们可以将以上分类简化成:
| Endpoint-Independent NAT mapping | Endpoint-Dependent NAT mapping (dst. IP only) | |
|---|---|---|
| Firewall is yes | Easy NAT | Hard NAT |
想了解更多新的 NAT 术语,可参考
如果自己实现 NAT,那应该(should)遵循这些 RFC 的规范,这样才能使你的 NAT 行为符合业界惯例,与其他厂商的设备或软件良好兼容。
补完基础知识(尤其是定义了什么是 hard NAT)之后,回到我们的 NAT 穿透主题。
准备放弃了吗? 这才进入 NAT 真正有挑战的部分:如果已经试过了前面介绍的所有方式 仍然不能穿透,我们该怎么办呢?
我们的保底解决方式是:创建一个中继连接(relay)实现双方的无障碍地通信。 但是,中继方式性能不是很差吗?这要看具体情况:
不过要注意:我们只有在无法直连时才会选择中继方式。实际场景中,
此外,某些网络会阻止 NAT 穿透,其影响比这种 hard NAT 大多了。例如,我们观察到 UC Berkeley guest WiFi 禁止除 DNS 流量之外的所有 outbound UDP 流量。 不管用什么 NAT 黑科技,都无法绕过这个拦截。因此我们终归还是需要一些可靠的 fallback 机制。
有多种中继实现方式。
Tailscale 并不使用 TURN。这种协议用起来并不是很好,而且与 STUN 不同, 它没有真正的交互性,因为互联网上并没有公开的 TURN 服务器。
这是我们创建的一个协议,DERP,
前面也简单提到过,DERP 既是我们在 NAT 穿透失败时的保底通信方式(此时的角色 与 TURN 类似),也是在其他一些场景下帮助我们完成 NAT 穿透的旁路信道。 换句话说,它既是我们的保底方式,也是有更好的穿透链路时,帮助我们进行连接升 级(upgrade to a peer-to-peer connection)的基础设施。
有了“中继”这种保底方式之后,我们穿透的成功率大大增加了。 如果此时不再阅读本文接下来的内容,而是把上面介绍的穿透方式都实现了,我预计:
这已经算是一个“足够好”的穿透实现了。
如果你并不满足于“足够好”,那我们可以做的事情还有很多!
本节将介绍一些五花八门的 tricks,在某些特殊场景下会帮到我们。单独使用这项技术都 无法解决 NAT 穿透问题,但将它们巧妙地组合起来,我们能更加接近 100% 的穿透成功率。
回忆 hard NAT 中遇到的问题,如下图所示,关键问题是:easy NAT 不知道该往 hard NAT 方的哪个 ip:port 发包。
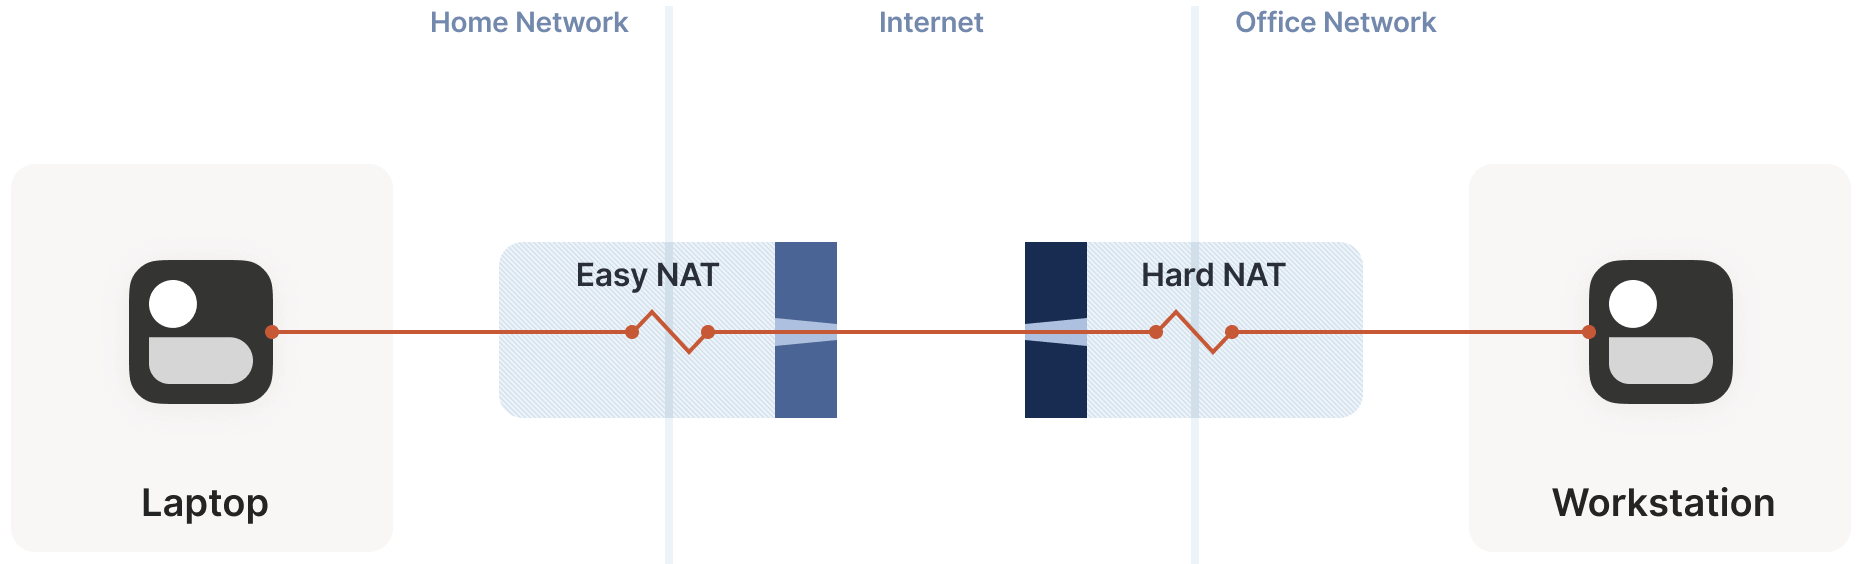
但必须要往正确的 ip:port 发包,才能穿透防火墙,实现双向互通。 怎么办呢?
ip:port,因为我们有 STUN 服务器。
这里先假设我们获得的这些 IP 地址都是正确的(这一点并不总是成立,但这里先这么假 设。而实际上,大部分情况下这一点都是成立的,如果对此有兴趣,可以参考 REQ-2 in RFC 4787)。
如果发包速度是 100 packets/s,那最坏情况下,需要 10 分钟来找到正确的端口。 还是那句话,这虽然不是最优的,但总比连不上好。
这很像是端口扫描(事实上,确实是),实际中可能会触发对方的网络入侵检测软件。
利用 birthday paradox 算法, 我们能对端口扫描进行改进。
ip:port), 然后 easy side 随机探测这边的端口。这里省去算法的数学模型,如果你对实现干兴趣,可以看看我写的 python calculator。 计算过程是“经典”生日悖论的一个小变种。 下面是随着 easy side random probe 次数(假设 hard size 256 个端口)的变化,两边打开的端口有重合(即通信成功)的概率:
| 随机探测次数 | 成功概率 |
|---|---|
| 174 | 50% |
| 256 | 64% |
| 1024 | 98% |
| 2048 | 99.9% |
根据以上结果,如果还是假设 100 ports/s 这样相当温和的探测速率,那 2 秒钟就有约 50% 的成功概率。 即使非常不走运,我们仍然能在 20s 时几乎 100% 穿透成功,而此时只探测了总端口空间的 4%。
非常好!虽然这种 hard NAT 给我们带来了严重的穿透延迟,但最终结果仍然是成功的。 那么,如果是两个 hard NAT,我们还能处理吗?
这种情况下仍然可以用前面的 多端口+随机探测 方式,但成功概率要低很多了:
{src port, dst port} 对,而不再是之前的一维 dst port 空间。这里我们也不就具体计算展开,只告诉结果:仍然假设目的端打开 256 个端口,从源端发起 2048 次(20 秒), 成功的概率是:0.01%。
如果你之前学过生日悖论,就并不会对这个结果感到惊讶。理论上来说,
对于某些应用来说,28 分钟可能仍然是一个可接受的时间。用半个小时暴力穿透 NAT 之后, 这个连接就可以一直用着 —— 除非 NAT 设备重启,那样就需要再次花半个小时穿透建个新连接。但对于 交互式应用来说,这样显然是不可接受的。
更糟糕的是,如果去看常见的办公网路由器,你会震惊于它的 active session low limit 有多么低。 例如,一台 Juniper SRX 300 最多支持 64,000 active sessions。 也就是说,
至此,我们通过这种方式穿透了比之前更难一些的网络拓扑。这是一个很大的成就,因为 家用路由器一般都是 easy NAT,hard NAT 一般都是办公网路由器或云 NAT 网关。 这意味着这种方式能帮我们解决
的场景,以及一部分
场景。
如果我们能让 NAT 设备的行为简单点,不要把事情搞这么复杂,那建 立连接(穿透)就会简单很多。真有这样的好事吗?还真有,有专门的一种协议叫 端口映射协议(port mapping protocols)。通过这种协议禁用掉前面 遇到的那些乱七八糟的东西之后,我们将得到一个非常简单的“请求-响应”。
下面是三个具体的端口映射协议:
最老的端口控制协议, 诞生于 1990s 晚期,因此使用了很多上世纪 90 年代的技术 (XML、SOAP、multicast HTTP over UDP —— 对,HTTP over UDP ),而且很难准确和安全地实现这个协议。但以前很多路由器都内置了 UPnP 协议, 现在仍然很多。
请求和响应:
lan-ip:port 转发到公网(WAN)”,wan-ip:port ”。UPnP IGD 出来几年之后,Apple 推出了一个功能类似的协议,名为 NAT-PMP (NAT Port Mapping Protocol)。
但与 UPnP 不同,这个协议只做端口转发,不管是在客户端还是服务端,实现起来都非常简单。
稍后一点,又出现了 NAT-PMP v2 版,并起了个新名字PCP (Port Control Protocol)。
因此要更好地实现穿透,可以
可以将这理解为一个加强版 STUN:我们不仅能发现自己的公网 ip:port,而且能指示我们的 NAT 设备对我们的通信对端友好一些 —— 但并不是为这个端口修改或添加防火墙规则。
但我们不能假设这个协议一定可用:
这一点非常常见,因为 UPnP 协议曾曝出一些高危漏洞(后面都修复了,因此如果是较新的设备,可以安全地使用 UPnP —— 如果实现没问题)。 不幸的是,某些设备的配置中,UPnP, NAT-PMP,PCP 是放在一个开关里的(可能 统称为 “UPnP” 功能),一开全开,一关全关。因此如果有人担心 UPnP 的安全性,他连另 外两个也用不了。
最后,终归来说,只要这种协议可用,就能有效地减少一次 NAT,大大方便建连过程。 但接下来看一些不常见的场景。
目前为止,我们看到的客户端和服务端都各只有一个 NAT 设备。如果有多个 NAT 设备会 怎么样?例如下面这种拓扑:
这个例子比较简单,不会给穿透带来太大问题。包从客户端 A 经过多次 NAT 到达公网的过程,与前面分析的穿过多层有状态防火墙是一样的:
具体来说,真正有影响的是端口转发协议。
ip:port,对端是用不了的;这就是为什么互联网上充斥着大量的文章说 double-NAT 有多糟糕,以 及警告用户为保持后向兼容不要使用 double-NAT。但实际上,double-NAT 对于绝大部分 互联网应用来说都是不可见的(透明的),因为大部分应用并不需要主动地做这种 NAT 穿 透。
但我也绝不是在建议你在自己的网络中设置 double-NAT。
但如果 double-NAT 并不是你能控制的,那除了不能用到这种端口映射协议之外,其他大部分东西都是不受影响的。
double-NAT 的故事到这里就结束了吗?—— 并没有,而且更大型的 double-NAT 场景将展现在我们面前。
即使用 NAT 来解决 IPv4 地址不够的问题,地址仍然是不够用的,ISP(互联网服务提供商) 显然 无法为每个家庭都分配一个公网 IP 地址。那怎么解决这个问题呢?ISP 的做法是不够了就再嵌套一层 NAT:
后面这种 NAT 就称为“运营商级 NAT”(carrier-grade NAT,或称电信级 NAT),缩写 CGNAT。如下图所示:

CGNAT 对 NAT 穿透来说是一个大麻烦。
好消息是:这其实是 double-NAT 的一个小变种,因此前面介绍的解决方式大部分还仍然是适用的。 某些东西可能会无法按预期工作,但只要肯给 ISP 交钱,这些也都能解决。 除了 port mapping protocols,其他我们已经介绍的所有东西在 CGNAT 里都是适用的。
但我们确实遇到了一个新挑战:如何直连两个在同一 CGNAT 但不同家用路由器中的对端呢?如下图所示:
在这种情况下,STUN 就无法正常工作了:STUN 看到的是客户端在公网(CGNAT 后面)看到的地址, 而我们想获得的是在 “middle network” 中的 ip:port,这才是对端真正需要的地址,
怎么办呢?
如果你想到了端口映射协议,那恭喜,答对了!如果 peer 中任何一个 NAT 支持端口映射协议, 对我们就能实现穿透,因为它分配的 ip:port 正是对端所需要的信息。
这里讽刺的是:double-NAT(指 CGNAT)破坏了端口映射协议,但在这里又救了我们! 当然,我们假设这些协议一定可用,因为 CGNAT ISP 倾向于在它们的家用路由器侧关闭 这些功能,已避免软件得到“错误的”结果,产生混淆。
如果不走运,NAT 上没有端口映射功能怎么办?
让我们回到基于 STUN 的技术,看会发生什么。两端在 CGNAT 的同一侧,假设 STUN 告诉我们 A 的地址是 2.2.2.2:1234,B 的地址是 2.2.2.2:5678。
那么接下来的问题是:如果 A 向 2.2.2.2:5678 发包会怎么样?期望的 CGNAT 行为是:
2.2.2.2:1234 -> 2.2.2.2:5678 进行 SNAT。2.2.2.2:5678 匹配到的是 B 的入向 NAT 映射,因此接着对这个包执行 DNAT,将目的 IP 改成 B 的私有地址。这种 NAT 行为有个专门的术语,叫 hairpinning(直译为发卡,意思 是像发卡一样,沿着一边上去,然后从另一边绕回来),
![]()
大家应该猜到的一个事实是:不是所以 NAT 都支持 hairpin 模式。 实际上,大量 well-behaved NAT 设备都不支持 hairpin 模式,
Hairpin 是所有 NAT 设备的特性(支持或不支持),并不是 CGNAT 独有的。
Hairpin 特性可有可无这件事有点遗憾,这可能也是为什么 hairpin 功能经常 broken 的原因。
Hairpinning 使内网连接的行为与公网连接的行为完成一致,因此我们无需关心目的 地址类型,也不用知晓自己是否在一台 CGNAT 后面。
如果 hairpinning 和 port mapping protocols 都不可用,那只能降级到中继模式了。
行文至此,一些读者可能已经对着屏幕咆哮:不要再用 IPv4 了! 花这么多时间精力解决这些没意义的东西,还不如直接换成 IPv6!
简单来说,是的,这也正是 IPv6 能做的事情。但是,也只说对了一半:在理想的全 IPv6 世界中,所有这些东西会变得更加简单,但我们面临的问题并不会完全消失 —— 因为有状态防火墙仍然还是存在的。
因此,我们仍然会用到
ip:port 信息的旁路信道但我们现在可以抛弃 STUN、生日悖论、端口映射协议、hairpin 等等东西了。 这是一个好消息!
另一个更加严峻的现实问题是:当前并不是一个全 IPv6 世界。目前世界上
不幸的是,这意味着,IPv6 **还**无法作为我们的解决方案。 就目前来说,它只是我们的工具箱中的一个备选。对于某些 peer 来说,它简直是完美工 具,但对其他 peer 来说,它是用不了的。如果目标是“任何情况下都能穿透(连接) 成功”,那我们就仍然需要 IPv4+NAT 那些东西。
IPv4/IPv6 共存也引出了一个新的场景:NAT64 设备。
前面介绍的都是 NAT44 设备:它们将一个 IPv4 地址转换成另一 IPv4 地址。 NAT64 从名字可以看出,是将一个内侧 IPv6 地址转换成一个外侧 IPv4 地址。 利用 DNS64 设备,我们能将 IPv4 DNS 应答给 IPv6 网络,这样对终端来说,它看到的就是一个 全 IPv6 网络,而仍然能访问 IPv4 公网。
Incidentally, you can extend this naming scheme indefinitely. There have been some experiments with NAT46; you could deploy NAT66 if you enjoy chaos; and some RFCs use NAT444 for carrier-grade NAT.
如果需要处理 DNS 问题,那这种方式工作良好。例如,如果连接到 google.com,将这个域名解析成 IP 地址的过程会涉及到 DNS64 设备,它又会进一步 involve NAT64 设备,但后一步对用户来说是无感知的。
但对于 NAT 和防火墙穿透来说,我们会关心每个具体的 IP 地址和端口。
如果设备支持 CLAT (Customer-side translator — from Customer XLAT),那我们就很幸运:
方法很简单:向 ipv4only.arpa. 发送一个 DNS 请求。这个域名会解析 到一个已知的、固定的 IPv4 地址,而且是纯 IPv4 地址。如果得到的 是一个 IPv6 地址,就可以判断有 DNS64 服务器做了转换,而它必然会用到 NAT64。这样 就能判断出 NAT64 的前缀是多少。
{NAT64 prefix + IPv4 address} 的 IPv6 包。 类似地,收到来源格式为 {NAT64 prefix + IPv4 address} 的包时,就是 IPv4 流量。ip:port,接 下来就回到经典的 NAT 穿透问题了 —— 除了需要多做一点点事情。幸运的是,如今的大部分 v6-only 网络都是移动运营商网络,而几乎所有手机都支持 CLAT。 运营 v6-only 网络的 ISPs 会在他们给你的路由器上部署 CLAT,因此最后你其实不需要做什么事情。 但如果想实现 100% 穿透,就需要解决这种边边角角的问题,即必须显式支持从 v6-only 网络连接 v4-only 对端。
至此,我们的 NAT 穿透之旅终于快结束了。我们已经覆盖了有状态防火墙、简单和高级 NAT、IPv4 和 IPv6。只要将以上解决方式都实现了,NAT 穿透的目的就达到了!
但是,
早期 NAT 穿透比较简单,能让我们精确判断出 peer 之间的路径特点,然后针对性地采用相应的解决方式。 但后面,网络工程师和 NAT 设备开发工程师引入了一些新理念,给路径判断造成很大困难。因此 我们需要简化客户端侧的思考(判断逻辑)。
这就要提到 Interactive Connectivity Establishment (ICE,交换式连接建立) 协议了。 与 STUN/TURN 类似,ICE 来自电信领域,因此其 RFC 充满了 SIP、SDP、信令会话、拨号等等电话术语。 但如果忽略这些领域术语,我们会看到它描述了一个极其优雅的判断最佳连接路径的算法。
真的?这个算法是:每种方法都试一遍,然后选择最佳的那个方法。就是这个算法,惊喜吗?
来更深入地看一下这个算法。
这里的讨论不会严格遵循 ICE spec,因此如果是在自己实现一个可互操作的 ICE 客户端,应该通读RFC 8445, 根据它的描述来实现。这里忽略所有电信术语,只关注核心的算法逻辑, 并提供几个在 ICE 规范允许范围的灵活建议。
ip:portsip:ports(局域网地址)ip:ports(公网地址,可能会经过 NAT64 转换)ip:port(NAT 设备的端口映射协议分配的公网地址)这些探测包有两个目的:
这个算法的优美之处在于:只要选择最佳线路(地址)的算法是正确的,那就总能获得最佳路径。
LAN > WAN > WAN+NAT 是一致的。 但相比于静态排序,我们是动态计算每条路径应该属于哪个类别。ICE spec 将协议组织为两个阶段:
但不一定要严格遵循这两个步骤的顺序。在 Tailscale,
但有一点需要关心:非对称路径。ICE 花了一些精力来保证通信双方选择的是相同的网络 路径,这样才能保证这条路径上有双向流量,能保持防火墙和 NAT 设备的连接一直处于 open 状态。 自己实现的话,其实并不需要花同样大的精力来实现这个保证,但需要确保你所有使用的所有路径上,都有双向流量。 这个目标就很简单了,只需要定期在所有已使用的路径上发 ping/pong 就行了。
要实现健壮性,还需要检测当前已选择的路径是否已经失败了(例如,NAT 设备维护清掉了所有状态), 如果失败了就要降级(downgrade)到其他路径。这里有两种方式:
考虑到发生降级的概率是非常小的,因此这种方式可能是更经济的。
最后需要提到安全。
本文的所有内容都假设:我们使用的上层协议已经有了自己的安全机制( 例如 QUIC 协议有 TLS 证书,WireGuard 协议有自己的公钥)。 如果还没有安全机制,那显然是要立即补上的。一旦动态切换路径,基于 IP 的安全机制就是无用的了 (IP 协议最开始就没怎么考虑安全性),至少要有端到端的认证。
我们终于完成了 NAT 穿透的目标!
如果实现了以上提到的所有技术,你将得到一个业内领先的 NAT 穿透软件,能在绝大多数场景下实现端到端直连。 如果直连不了,还可以降级到保底的中继模式(对于长尾来说只能靠中继了)。
但这些工作相当复杂!其中一些问题研究起来很有意思,但很难做到完全正确,尤其是那些 非常边边角角的场景,真正出现的概率极小,但解决它们所需花费的经历又极大。 不过,这种工作只需要做一次,一旦解决了,你就具备了某种超级能力: 探索令人激动的、相对还比较崭新的端到端应用(peer-to-peer applications)世界。
去中心化软件领域中的许多有趣想法,简化之后其实都变成了 跨过公网(互联网)实现端到端直连 这一问题,开始时可能觉得很简单,但真正做才 发现比想象中难多了。现在知道如何解决这个问题了,动手开做吧!
实现健壮的 NAT 穿透需要下列基础:
然后需要:
ip:port;ip:port 信息,以及判断自己这一侧的 NAT 的“难度”(difficulty);ip:ports;ip:port;ip:ports 信息通过旁路信道与 peer 交换,以及某些加密秘钥来保证通信安全;ip:port,以及执行生日攻击(birthday attacks)来穿透 harder NAT;Views: 19
先把目录列一下,有空补充
Views: 9