3.71更换了数据库,必须使用h2或postgresql数据库才能升级成功,而且nexus并不能自动升级数据库,这带来了不小的难度。
- 备份现有数据库
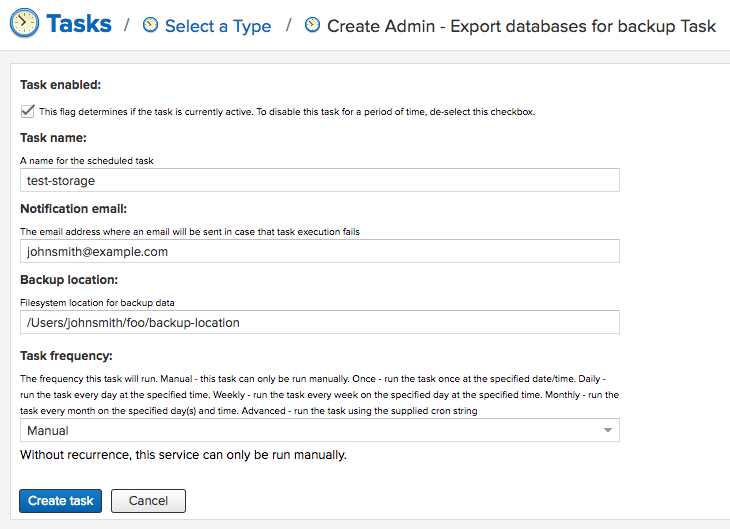
在task里面创建一个Admin – Export databases for backup任务

Backup location选择一个方便访问的位置,备份完成后会出现以.bak结尾的文件。 -
转换为h2数据库
下载:https://download.sonatype.com/nexus/nxrm3-migrator/nexus-db-migrator-3.70.1-03.jar
然后在.bak所在的目录下执行:
java -Xmx16G -Xms16G -XX:+UseG1GC -XX:MaxDirectMemorySize=28672M -jar nexus-db-migrator-*.jar --migration_type=h2
命令执行后会生成nexus.mv.db文件,把这个文件移入db目录
执行chown 200:200 nexus.mv.db,这一句一定要执行
然后修改etc/nexus.properties,加入nexus.datastore.enabled=true nexus.h2.httpListenerEnabled=true nexus.h2.httpListenerPort=1234 - 升级数据库
现在重启nexus等待启动完毕数据库就升级完成了
- 解决主键重复问题(拉取文件时报500错误)
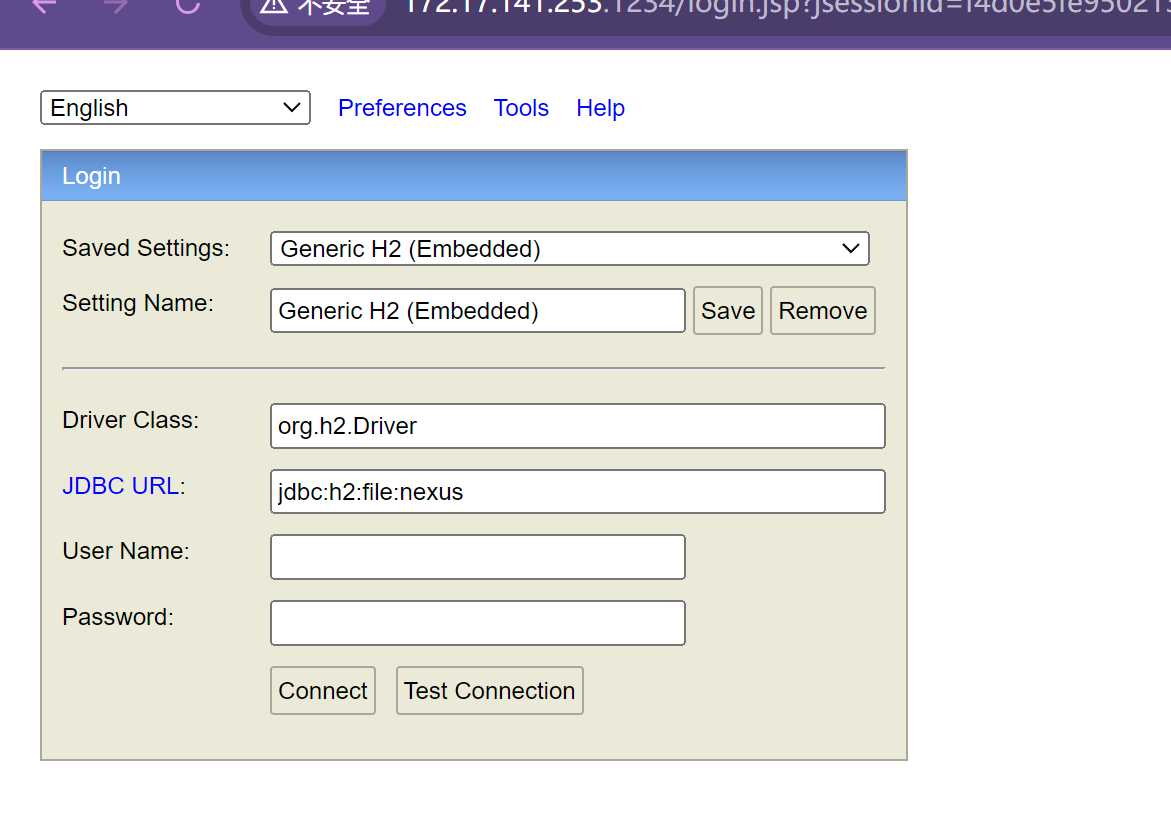
进入h2控制台:http://172.30.0.23:1234

执行以下代码:
ALTER TABLE TAG ALTER COLUMN ID RESTART WITH SELECT max(ID) + 1 FROM TAG; ALTER TABLE RAW_CONTENT_REPOSITORY ALTER COLUMN REPOSITORY_ID RESTART WITH SELECT max(REPOSITORY_ID) + 1 FROM RAW_CONTENT_REPOSITORY; ALTER TABLE RAW_COMPONENT ALTER COLUMN COMPONENT_ID RESTART WITH SELECT max(COMPONENT_ID) + 1 FROM RAW_COMPONENT; ALTER TABLE RAW_COMPONENT_TAG ALTER COLUMN COMPONENT_TAG_ID RESTART WITH SELECT max(COMPONENT_TAG_ID) + 1 FROM RAW_COMPONENT_TAG; ALTER TABLE RAW_ASSET_BLOB ALTER COLUMN ASSET_BLOB_ID RESTART WITH SELECT max(ASSET_BLOB_ID) + 1 FROM RAW_ASSET_BLOB; ALTER TABLE APT_BROWSE_NODE ALTER COLUMN NODE_ID RESTART WITH SELECT max(NODE_ID) + 1 FROM APT_BROWSE_NODE; ALTER TABLE MAVEN2_CONTENT_REPOSITORY ALTER COLUMN REPOSITORY_ID RESTART WITH SELECT max(REPOSITORY_ID) + 1 FROM MAVEN2_CONTENT_REPOSITORY; ALTER TABLE UPGRADE_TASKS ALTER COLUMN ID RESTART WITH SELECT max(ID) + 1 FROM UPGRADE_TASKS; ALTER TABLE SOFT_DELETED_BLOBS ALTER COLUMN RECORD_ID RESTART WITH SELECT max(RECORD_ID) + 1 FROM SOFT_DELETED_BLOBS; ALTER TABLE MAVEN2_COMPONENT_TAG ALTER COLUMN COMPONENT_TAG_ID RESTART WITH SELECT max(COMPONENT_TAG_ID) + 1 FROM MAVEN2_COMPONENT_TAG; ALTER TABLE MAVEN2_ASSET_BLOB ALTER COLUMN ASSET_BLOB_ID RESTART WITH SELECT max(ASSET_BLOB_ID) + 1 FROM MAVEN2_ASSET_BLOB; ALTER TABLE NUGET_CONTENT_REPOSITORY ALTER COLUMN REPOSITORY_ID RESTART WITH SELECT max(REPOSITORY_ID) + 1 FROM NUGET_CONTENT_REPOSITORY; ALTER TABLE NPM_BROWSE_NODE ALTER COLUMN NODE_ID RESTART WITH SELECT max(NODE_ID) + 1 FROM NPM_BROWSE_NODE; ALTER TABLE NUGET_ASSET ALTER COLUMN ASSET_ID RESTART WITH SELECT max(ASSET_ID) + 1 FROM NUGET_ASSET; ALTER TABLE NUGET_COMPONENT_TAG ALTER COLUMN COMPONENT_TAG_ID RESTART WITH SELECT max(COMPONENT_TAG_ID) + 1 FROM NUGET_COMPONENT_TAG; ALTER TABLE NUGET_ASSET_BLOB ALTER COLUMN ASSET_BLOB_ID RESTART WITH SELECT max(ASSET_BLOB_ID) + 1 FROM NUGET_ASSET_BLOB; ALTER TABLE HELM_CONTENT_REPOSITORY ALTER COLUMN REPOSITORY_ID RESTART WITH SELECT max(REPOSITORY_ID) + 1 FROM HELM_CONTENT_REPOSITORY; ALTER TABLE HELM_COMPONENT ALTER COLUMN COMPONENT_ID RESTART WITH SELECT max(COMPONENT_ID) + 1 FROM HELM_COMPONENT; ALTER TABLE HELM_COMPONENT_TAG ALTER COLUMN COMPONENT_TAG_ID RESTART WITH SELECT max(COMPONENT_TAG_ID) + 1 FROM HELM_COMPONENT_TAG; ALTER TABLE HELM_ASSET_BLOB ALTER COLUMN ASSET_BLOB_ID RESTART WITH SELECT max(ASSET_BLOB_ID) + 1 FROM HELM_ASSET_BLOB; ALTER TABLE YUM_BROWSE_NODE ALTER COLUMN NODE_ID RESTART WITH SELECT max(NODE_ID) + 1 FROM YUM_BROWSE_NODE; ALTER TABLE DOCKER_CONTENT_REPOSITORY ALTER COLUMN REPOSITORY_ID RESTART WITH SELECT max(REPOSITORY_ID) + 1 FROM DOCKER_CONTENT_REPOSITORY; ALTER TABLE DOCKER_COMPONENT ALTER COLUMN COMPONENT_ID RESTART WITH SELECT max(COMPONENT_ID) + 1 FROM DOCKER_COMPONENT; ALTER TABLE DOCKER_COMPONENT_TAG ALTER COLUMN COMPONENT_TAG_ID RESTART WITH SELECT max(COMPONENT_TAG_ID) + 1 FROM DOCKER_COMPONENT_TAG; ALTER TABLE DOCKER_ASSET_BLOB ALTER COLUMN ASSET_BLOB_ID RESTART WITH SELECT max(ASSET_BLOB_ID) + 1 FROM DOCKER_ASSET_BLOB; ALTER TABLE RUBYGEMS_BROWSE_NODE ALTER COLUMN NODE_ID RESTART WITH SELECT max(NODE_ID) + 1 FROM RUBYGEMS_BROWSE_NODE; ALTER TABLE PYPI_CONTENT_REPOSITORY ALTER COLUMN REPOSITORY_ID RESTART WITH SELECT max(REPOSITORY_ID) + 1 FROM PYPI_CONTENT_REPOSITORY; ALTER TABLE PYPI_COMPONENT ALTER COLUMN COMPONENT_ID RESTART WITH SELECT max(COMPONENT_ID) + 1 FROM PYPI_COMPONENT; ALTER TABLE PYPI_COMPONENT_TAG ALTER COLUMN COMPONENT_TAG_ID RESTART WITH SELECT max(COMPONENT_TAG_ID) + 1 FROM PYPI_COMPONENT_TAG; ALTER TABLE PYPI_ASSET_BLOB ALTER COLUMN ASSET_BLOB_ID RESTART WITH SELECT max(ASSET_BLOB_ID) + 1 FROM PYPI_ASSET_BLOB; ALTER TABLE GITLFS_BROWSE_NODE ALTER COLUMN NODE_ID RESTART WITH SELECT max(NODE_ID) + 1 FROM GITLFS_BROWSE_NODE; ALTER TABLE YUM_CONTENT_REPOSITORY ALTER COLUMN REPOSITORY_ID RESTART WITH SELECT max(REPOSITORY_ID) + 1 FROM YUM_CONTENT_REPOSITORY; ALTER TABLE YUM_COMPONENT ALTER COLUMN COMPONENT_ID RESTART WITH SELECT max(COMPONENT_ID) + 1 FROM YUM_COMPONENT; ALTER TABLE YUM_COMPONENT_TAG ALTER COLUMN COMPONENT_TAG_ID RESTART WITH SELECT max(COMPONENT_TAG_ID) + 1 FROM YUM_COMPONENT_TAG; ALTER TABLE YUM_ASSET_BLOB ALTER COLUMN ASSET_BLOB_ID RESTART WITH SELECT max(ASSET_BLOB_ID) + 1 FROM YUM_ASSET_BLOB; ALTER TABLE DOCKER_BROWSE_NODE ALTER COLUMN NODE_ID RESTART WITH SELECT max(NODE_ID) + 1 FROM DOCKER_BROWSE_NODE; ALTER TABLE NPM_CONTENT_REPOSITORY ALTER COLUMN REPOSITORY_ID RESTART WITH SELECT max(REPOSITORY_ID) + 1 FROM NPM_CONTENT_REPOSITORY; ALTER TABLE NPM_COMPONENT ALTER COLUMN COMPONENT_ID RESTART WITH SELECT max(COMPONENT_ID) + 1 FROM NPM_COMPONENT; ALTER TABLE NPM_COMPONENT_TAG ALTER COLUMN COMPONENT_TAG_ID RESTART WITH SELECT max(COMPONENT_TAG_ID) + 1 FROM NPM_COMPONENT_TAG; ALTER TABLE NPM_ASSET_BLOB ALTER COLUMN ASSET_BLOB_ID RESTART WITH SELECT max(ASSET_BLOB_ID) + 1 FROM NPM_ASSET_BLOB; ALTER TABLE RAW_BROWSE_NODE ALTER COLUMN NODE_ID RESTART WITH SELECT max(NODE_ID) + 1 FROM RAW_BROWSE_NODE; ALTER TABLE APT_CONTENT_REPOSITORY ALTER COLUMN REPOSITORY_ID RESTART WITH SELECT max(REPOSITORY_ID) + 1 FROM APT_CONTENT_REPOSITORY; ALTER TABLE APT_COMPONENT ALTER COLUMN COMPONENT_ID RESTART WITH SELECT max(COMPONENT_ID) + 1 FROM APT_COMPONENT; ALTER TABLE APT_COMPONENT_TAG ALTER COLUMN COMPONENT_TAG_ID RESTART WITH SELECT max(COMPONENT_TAG_ID) + 1 FROM APT_COMPONENT_TAG; ALTER TABLE APT_ASSET_BLOB ALTER COLUMN ASSET_BLOB_ID RESTART WITH SELECT max(ASSET_BLOB_ID) + 1 FROM APT_ASSET_BLOB; ALTER TABLE MAVEN2_BROWSE_NODE ALTER COLUMN NODE_ID RESTART WITH SELECT max(NODE_ID) + 1 FROM MAVEN2_BROWSE_NODE; ALTER TABLE CONDA_CONTENT_REPOSITORY ALTER COLUMN REPOSITORY_ID RESTART WITH SELECT max(REPOSITORY_ID) + 1 FROM CONDA_CONTENT_REPOSITORY; ALTER TABLE CONDA_COMPONENT ALTER COLUMN COMPONENT_ID RESTART WITH SELECT max(COMPONENT_ID) + 1 FROM CONDA_COMPONENT; ALTER TABLE CONDA_COMPONENT_TAG ALTER COLUMN COMPONENT_TAG_ID RESTART WITH SELECT max(COMPONENT_TAG_ID) + 1 FROM CONDA_COMPONENT_TAG; ALTER TABLE CONDA_ASSET_BLOB ALTER COLUMN ASSET_BLOB_ID RESTART WITH SELECT max(ASSET_BLOB_ID) + 1 FROM CONDA_ASSET_BLOB; ALTER TABLE PYPI_BROWSE_NODE ALTER COLUMN NODE_ID RESTART WITH SELECT max(NODE_ID) + 1 FROM PYPI_BROWSE_NODE; ALTER TABLE CONAN_CONTENT_REPOSITORY ALTER COLUMN REPOSITORY_ID RESTART WITH SELECT max(REPOSITORY_ID) + 1 FROM CONAN_CONTENT_REPOSITORY; ALTER TABLE CONAN_COMPONENT ALTER COLUMN COMPONENT_ID RESTART WITH SELECT max(COMPONENT_ID) + 1 FROM CONAN_COMPONENT; ALTER TABLE CONAN_COMPONENT_TAG ALTER COLUMN COMPONENT_TAG_ID RESTART WITH SELECT max(COMPONENT_TAG_ID) + 1 FROM CONAN_COMPONENT_TAG; ALTER TABLE CONAN_ASSET_BLOB ALTER COLUMN ASSET_BLOB_ID RESTART WITH SELECT max(ASSET_BLOB_ID) + 1 FROM CONAN_ASSET_BLOB; ALTER TABLE CONDA_BROWSE_NODE ALTER COLUMN NODE_ID RESTART WITH SELECT max(NODE_ID) + 1 FROM CONDA_BROWSE_NODE; ALTER TABLE R_CONTENT_REPOSITORY ALTER COLUMN REPOSITORY_ID RESTART WITH SELECT max(REPOSITORY_ID) + 1 FROM R_CONTENT_REPOSITORY; ALTER TABLE R_COMPONENT ALTER COLUMN COMPONENT_ID RESTART WITH SELECT max(COMPONENT_ID) + 1 FROM R_COMPONENT; ALTER TABLE R_COMPONENT_TAG ALTER COLUMN COMPONENT_TAG_ID RESTART WITH SELECT max(COMPONENT_TAG_ID) + 1 FROM R_COMPONENT_TAG; ALTER TABLE R_ASSET_BLOB ALTER COLUMN ASSET_BLOB_ID RESTART WITH SELECT max(ASSET_BLOB_ID) + 1 FROM R_ASSET_BLOB; ALTER TABLE CONAN_BROWSE_NODE ALTER COLUMN NODE_ID RESTART WITH SELECT max(NODE_ID) + 1 FROM CONAN_BROWSE_NODE; ALTER TABLE GITLFS_CONTENT_REPOSITORY ALTER COLUMN REPOSITORY_ID RESTART WITH SELECT max(REPOSITORY_ID) + 1 FROM GITLFS_CONTENT_REPOSITORY; ALTER TABLE GITLFS_COMPONENT ALTER COLUMN COMPONENT_ID RESTART WITH SELECT max(COMPONENT_ID) + 1 FROM GITLFS_COMPONENT; ALTER TABLE GITLFS_COMPONENT_TAG ALTER COLUMN COMPONENT_TAG_ID RESTART WITH SELECT max(COMPONENT_TAG_ID) + 1 FROM GITLFS_COMPONENT_TAG; ALTER TABLE GITLFS_ASSET_BLOB ALTER COLUMN ASSET_BLOB_ID RESTART WITH SELECT max(ASSET_BLOB_ID) + 1 FROM GITLFS_ASSET_BLOB; ALTER TABLE HELM_BROWSE_NODE ALTER COLUMN NODE_ID RESTART WITH SELECT max(NODE_ID) + 1 FROM HELM_BROWSE_NODE; ALTER TABLE COCOAPODS_CONTENT_REPOSITORY ALTER COLUMN REPOSITORY_ID RESTART WITH SELECT max(REPOSITORY_ID) + 1 FROM COCOAPODS_CONTENT_REPOSITORY; ALTER TABLE COCOAPODS_COMPONENT ALTER COLUMN COMPONENT_ID RESTART WITH SELECT max(COMPONENT_ID) + 1 FROM COCOAPODS_COMPONENT; ALTER TABLE COCOAPODS_COMPONENT_TAG ALTER COLUMN COMPONENT_TAG_ID RESTART WITH SELECT max(COMPONENT_TAG_ID) + 1 FROM COCOAPODS_COMPONENT_TAG; ALTER TABLE COCOAPODS_ASSET_BLOB ALTER COLUMN ASSET_BLOB_ID RESTART WITH SELECT max(ASSET_BLOB_ID) + 1 FROM COCOAPODS_ASSET_BLOB; ALTER TABLE R_BROWSE_NODE ALTER COLUMN NODE_ID RESTART WITH SELECT max(NODE_ID) + 1 FROM R_BROWSE_NODE; ALTER TABLE RUBYGEMS_CONTENT_REPOSITORY ALTER COLUMN REPOSITORY_ID RESTART WITH SELECT max(REPOSITORY_ID) + 1 FROM RUBYGEMS_CONTENT_REPOSITORY; ALTER TABLE RUBYGEMS_COMPONENT ALTER COLUMN COMPONENT_ID RESTART WITH SELECT max(COMPONENT_ID) + 1 FROM RUBYGEMS_COMPONENT; ALTER TABLE RUBYGEMS_COMPONENT_TAG ALTER COLUMN COMPONENT_TAG_ID RESTART WITH SELECT max(COMPONENT_TAG_ID) + 1 FROM RUBYGEMS_COMPONENT_TAG; ALTER TABLE RUBYGEMS_ASSET_BLOB ALTER COLUMN ASSET_BLOB_ID RESTART WITH SELECT max(ASSET_BLOB_ID) + 1 FROM RUBYGEMS_ASSET_BLOB; ALTER TABLE NUGET_BROWSE_NODE ALTER COLUMN NODE_ID RESTART WITH SELECT max(NODE_ID) + 1 FROM NUGET_BROWSE_NODE; ALTER TABLE GO_CONTENT_REPOSITORY ALTER COLUMN REPOSITORY_ID RESTART WITH SELECT max(REPOSITORY_ID) + 1 FROM GO_CONTENT_REPOSITORY; ALTER TABLE GO_COMPONENT ALTER COLUMN COMPONENT_ID RESTART WITH SELECT max(COMPONENT_ID) + 1 FROM GO_COMPONENT; ALTER TABLE GO_COMPONENT_TAG ALTER COLUMN COMPONENT_TAG_ID RESTART WITH SELECT max(COMPONENT_TAG_ID) + 1 FROM GO_COMPONENT_TAG; ALTER TABLE GO_ASSET_BLOB ALTER COLUMN ASSET_BLOB_ID RESTART WITH SELECT max(ASSET_BLOB_ID) + 1 FROM GO_ASSET_BLOB; ALTER TABLE COCOAPODS_BROWSE_NODE ALTER COLUMN NODE_ID RESTART WITH SELECT max(NODE_ID) + 1 FROM COCOAPODS_BROWSE_NODE; ALTER TABLE P2_CONTENT_REPOSITORY ALTER COLUMN REPOSITORY_ID RESTART WITH SELECT max(REPOSITORY_ID) + 1 FROM P2_CONTENT_REPOSITORY; ALTER TABLE P2_COMPONENT ALTER COLUMN COMPONENT_ID RESTART WITH SELECT max(COMPONENT_ID) + 1 FROM P2_COMPONENT; ALTER TABLE P2_COMPONENT_TAG ALTER COLUMN COMPONENT_TAG_ID RESTART WITH SELECT max(COMPONENT_TAG_ID) + 1 FROM P2_COMPONENT_TAG; ALTER TABLE P2_ASSET_BLOB ALTER COLUMN ASSET_BLOB_ID RESTART WITH SELECT max(ASSET_BLOB_ID) + 1 FROM P2_ASSET_BLOB; ALTER TABLE GO_BROWSE_NODE ALTER COLUMN NODE_ID RESTART WITH SELECT max(NODE_ID) + 1 FROM GO_BROWSE_NODE; ALTER TABLE MAVEN2_COMPONENT ALTER COLUMN COMPONENT_ID RESTART WITH SELECT max(COMPONENT_ID) + 1 FROM MAVEN2_COMPONENT; ALTER TABLE LOGGING_OVERRIDES ALTER COLUMN ID RESTART WITH SELECT max(ID) + 1 FROM LOGGING_OVERRIDES; ALTER TABLE BLOB_STORE_METRICS ALTER COLUMN ID RESTART WITH SELECT max(ID) + 1 FROM BLOB_STORE_METRICS; ALTER TABLE MAVEN2_ASSET ALTER COLUMN ASSET_ID RESTART WITH SELECT max(ASSET_ID) + 1 FROM MAVEN2_ASSET; ALTER TABLE APT_KEY_VALUE ALTER COLUMN KEY_VALUE_ID RESTART WITH SELECT max(KEY_VALUE_ID) + 1 FROM APT_KEY_VALUE; ALTER TABLE APT_ASSET ALTER COLUMN ASSET_ID RESTART WITH SELECT max(ASSET_ID) + 1 FROM APT_ASSET; ALTER TABLE RAW_ASSET ALTER COLUMN ASSET_ID RESTART WITH SELECT max(ASSET_ID) + 1 FROM RAW_ASSET; ALTER TABLE AGGREGATED_METRICS ALTER COLUMN AGGREGATED_METRIC_ID RESTART WITH SELECT max(AGGREGATED_METRIC_ID) + 1 FROM AGGREGATED_METRICS; ALTER TABLE HISTORICAL_LOGIN_INFO ALTER COLUMN HISTORICAL_LOGIN_INFO_ID RESTART WITH SELECT max(HISTORICAL_LOGIN_INFO_ID) + 1 FROM HISTORICAL_LOGIN_INFO; ALTER TABLE METRICS_LOG ALTER COLUMN METRIC_ID RESTART WITH SELECT max(METRIC_ID) + 1 FROM METRICS_LOG; ALTER TABLE NPM_ASSET ALTER COLUMN ASSET_ID RESTART WITH SELECT max(ASSET_ID) + 1 FROM NPM_ASSET; ALTER TABLE NUGET_COMPONENT ALTER COLUMN COMPONENT_ID RESTART WITH SELECT max(COMPONENT_ID) + 1 FROM NUGET_COMPONENT; ALTER TABLE RUBYGEMS_ASSET ALTER COLUMN ASSET_ID RESTART WITH SELECT max(ASSET_ID) + 1 FROM RUBYGEMS_ASSET; ALTER TABLE DOWNLOAD_COUNT ALTER COLUMN DOWNLOAD_COUNT_ID RESTART WITH SELECT max(DOWNLOAD_COUNT_ID) + 1 FROM DOWNLOAD_COUNT; ALTER TABLE DOCKER_ASSET ALTER COLUMN ASSET_ID RESTART WITH SELECT max(ASSET_ID) + 1 FROM DOCKER_ASSET; ALTER TABLE YUM_KEY_VALUE ALTER COLUMN KEY_VALUE_ID RESTART WITH SELECT max(KEY_VALUE_ID) + 1 FROM YUM_KEY_VALUE; ALTER TABLE YUM_ASSET ALTER COLUMN ASSET_ID RESTART WITH SELECT max(ASSET_ID) + 1 FROM YUM_ASSET; ALTER TABLE COMPONENT_APPLICATION_SCAN_SCHEDULE ALTER COLUMN ID RESTART WITH SELECT max(ID) + 1 FROM COMPONENT_APPLICATION_SCAN_SCHEDULE; ALTER TABLE COMPONENT_APPLICATION_SCAN ALTER COLUMN ID RESTART WITH SELECT max(ID) + 1 FROM COMPONENT_APPLICATION_SCAN; ALTER TABLE HELM_KEY_VALUE ALTER COLUMN KEY_VALUE_ID RESTART WITH SELECT max(KEY_VALUE_ID) + 1 FROM HELM_KEY_VALUE; ALTER TABLE HELM_ASSET ALTER COLUMN ASSET_ID RESTART WITH SELECT max(ASSET_ID) + 1 FROM HELM_ASSET; ALTER TABLE GITLFS_ASSET ALTER COLUMN ASSET_ID RESTART WITH SELECT max(ASSET_ID) + 1 FROM GITLFS_ASSET; ALTER TABLE PYPI_ASSET ALTER COLUMN ASSET_ID RESTART WITH SELECT max(ASSET_ID) + 1 FROM PYPI_ASSET; ALTER TABLE CONDA_ASSET ALTER COLUMN ASSET_ID RESTART WITH SELECT max(ASSET_ID) + 1 FROM CONDA_ASSET; ALTER TABLE CONAN_ASSET ALTER COLUMN ASSET_ID RESTART WITH SELECT max(ASSET_ID) + 1 FROM CONAN_ASSET; ALTER TABLE R_ASSET ALTER COLUMN ASSET_ID RESTART WITH SELECT max(ASSET_ID) + 1 FROM R_ASSET; ALTER TABLE COCOAPODS_ASSET ALTER COLUMN ASSET_ID RESTART WITH SELECT max(ASSET_ID) + 1 FROM COCOAPODS_ASSET; ALTER TABLE GO_ASSET ALTER COLUMN ASSET_ID RESTART WITH SELECT max(ASSET_ID) + 1 FROM GO_ASSET; ALTER TABLE P2_ASSET ALTER COLUMN ASSET_ID RESTART WITH SELECT max(ASSET_ID) + 1 FROM P2_ASSET; ALTER TABLE P2_BROWSE_NODE ALTER COLUMN NODE_ID RESTART WITH SELECT max(NODE_ID) + 1 FROM P2_BROWSE_NODE; -
升级nexus到3.71
docker的话直接pull最新版本的镜像即可
参考:
https://github.com/sonatype/nexus-public/issues/449
https://community.sonatype.com/t/migrating-to-3-71-on-a-docker-based-installation/13045
Views: 93
