setterm –foreground green –store
此命令需要在物理终端上执行,ssh不支持
Views: 309
setterm –foreground green –store
此命令需要在物理终端上执行,ssh不支持
Views: 309
编辑/etc/opkg/distfeeds.conf,替换内容如下
src/gz immortalwrt_core https://mirrors.hetao.me/immortalwrt/releases/23.05.1/targets/armsr/armv8/packages
src/gz immortalwrt_base https://mirrors.hetao.me/immortalwrt/releases/23.05.1/packages/aarch64_generic/base
src/gz immortalwrt_luci https://mirrors.hetao.me/immortalwrt/releases/23.05.1/packages/aarch64_generic/luci
src/gz immortalwrt_packages https://mirrors.hetao.me/immortalwrt/releases/23.05.1/packages/aarch64_generic/packages
src/gz immortalwrt_routing https://mirrors.hetao.me/immortalwrt/releases/23.05.1/packages/aarch64_generic/routing
src/gz immortalwrt_telephony https://mirrors.hetao.me/immortalwrt/releases/23.05.1/packages/aarch64_generic/telephony
Views: 175
打开/usr/share/perl5/PVE/APLInfo.pm
找到get_apl_sources部分,把对应的url替换掉
如果是arm版本的替换为
https://mirrors.hetao.me/proxmox-port
如果是x86-64版本的替换为
https://mirrors.hetao.me/proxmox
systemctl restart pvedaemon
如果不生效可以考虑重启电脑
我发现单独替换url是可以的,如果替换host就会失败。
Views: 252
apt install intel-microcode
/etc/default/grub设置
GRUB_CMDLINE_LINUX_DEFAULT=”quiet pcie_aspm=off intel_idle.max_cstate=2″
update-grub
Views: 168
git clone https://github.com/denyhosts/denyhosts.git
cd denyhosts
python setup.py install
cp denyhosts.conf /etc
cp daemon-control-dist /usr/share/denyhosts/daemon-control
cp denyhosts.py /usr/sbin/denyhosts.py
cd /etc/init.d
ln -s /usr/share/denyhosts/daemon-control denyhosts
编辑denyhosts
从第2行开始添加以下内容
### BEGIN INIT INFO
# Default-Start:     2 3 4 5
# Default-Stop:      0 1 6
### END INIT INFO
systemctl enable denyhosts
systemctl start denyhosts
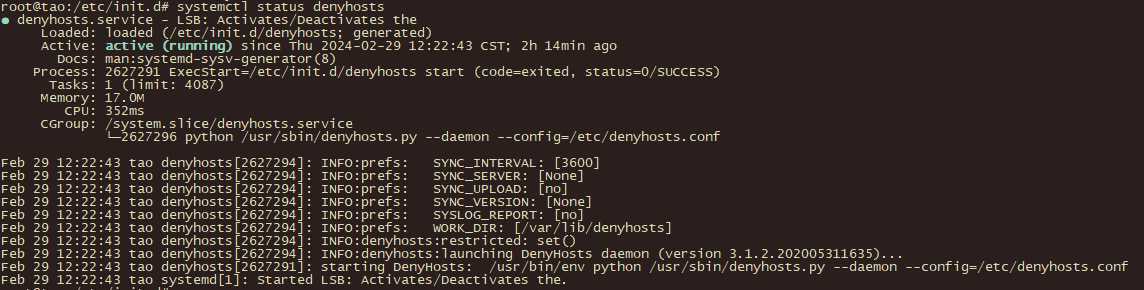
Views: 188
z270e比z270g还要麻烦一些,因为有发光罩在网卡上面。
1. 先把主板完全拆下来
2. 拆掉LED发光板
主板背面的3个黑色小螺丝拧掉就可以了
3. 拆掉无线网卡屏蔽罩
主板背面的2个白色小螺丝拧掉
4. 拆掉M.2网卡模块
把屏蔽罩取下来,把屏蔽罩上的小螺丝拧掉,打开屏蔽罩,然后把M2网卡模块上的固定螺丝拧掉,拔掉天线馈线取下M2网卡模块
5. 装入新的网卡模块
把新的intel be200无线网卡装进去,拧上固定累丝,安装好馈线。然后把其它的再原样装回去就好了
开机后第一次启动很长时间没亮,以为坏了,然后再次启动成功点亮,进系统,安装驱动,蓝牙和wifi都能用。
Views: 153
设置服务端
systemctl enable --now systemd-journal-remote.socket
systemctl enable systemd-journal-remote.service
申请证书
acme.sh --issue --dns dns_gd -d hetao.me
acme.sh --installcert -d nanopi.hetao.me --cert-file /opt/certs/nanopi.hetao.me/nanopi.hetao.me.cer --key-file /opt/certs/nanopi.hetao.me/nanopi.hetao.me.key --fullchain-file /opt/certs/nanopi.hetao.me/fullchain.cer --ca-file /opt/certs/nanopi.hetao.me/ca.cer
编辑文件/etc/systemd/journal-remote.conf,内容为
[Remote]
Seal=false
SplitMode=host
ServerKeyFile=/opt/certs/nanopi.hetao.me/nanopi.hetao.me.key
ServerCertificateFile=/opt/certs/nanopi.hetao.me/fullchain.cer
TrustedCertificateFile=/opt/certs/nanopi.hetao.me/ca.cer
启动服务
systemctl start systemd-journal-remote.service
设置客户端
添加用户
adduser --system --home /run/systemd --no-create-home --disabled-login --group systemd-journal-upload
申请证书
acme.sh --issue --dns dns_pdns -d ros.hetao.me
acme.sh --installcert -d ros.hetao.me --cert-file /opt/certs/ros.hetao.me/ros.hetao.me.cer --key-file /opt/certs/ros.hetao.me/ros.hetao.me.key --fullchain-file /opt/certs/ros.hetao.me/fullchain.cer --ca-file /opt/certs/ros.hetao.me/ca.cer
申请证书的时候服务端和客户端的证书CA要一样,而且签名算法要一致,比如同为RSA或ECC算法。可 以是公共证书也可以是私有证书,重点是CA要完全一样。
编辑文件/etc/systemd/journal-upload.conf,内容为
[Upload]
URL=https://nanopi.hetao.me:19532
ServerKeyFile=/opt/certs/ros.hetao.me/ros.hetao.me.key
ServerCertificateFile=/opt/certs/ros.hetao.me/fullchain.cer
TrustedCertificateFile=/opt/certs/ros.hetao.me/ca.cer
重启服务
systemctl restart systemd-journal-upload.service
测试
客户端执行
logger -p syslog.debug "### TEST MESSAGE from hetao.me ###"
然后在服务端查看日志
journalctl -f -n 20 --file=/var/log/journal/remote/remote-CN=ros.hetao.me.journal
关于证书申请部分要根据自己的情况来,只要保证CA一致就行
Views: 124
$template remote-incoming-logs, "/var/log/remote/%HOSTNAME%.log"
if $hostname contains 'ros' then {
*.* ?remote-incoming-logs
}
mkdir /var/log/remote
chown syslog:adm /var/log/remote
编辑/etc/rsyslog.conf
反注释
module(load="imudp")
input(type="imudp" port="514")
这两行
systemctl restart rsyslog
. @192.168.33.15:514
其中192.168.33.15是日志服务器的IP,一个@符表示UDP协议,两个@@符表示TCP协议
systemctl restart rsyslog
logger -n 192.168.33.15 --udp --port=514 "Test message from client over UDP"tail /var/log/remote/ros.logViews: 103
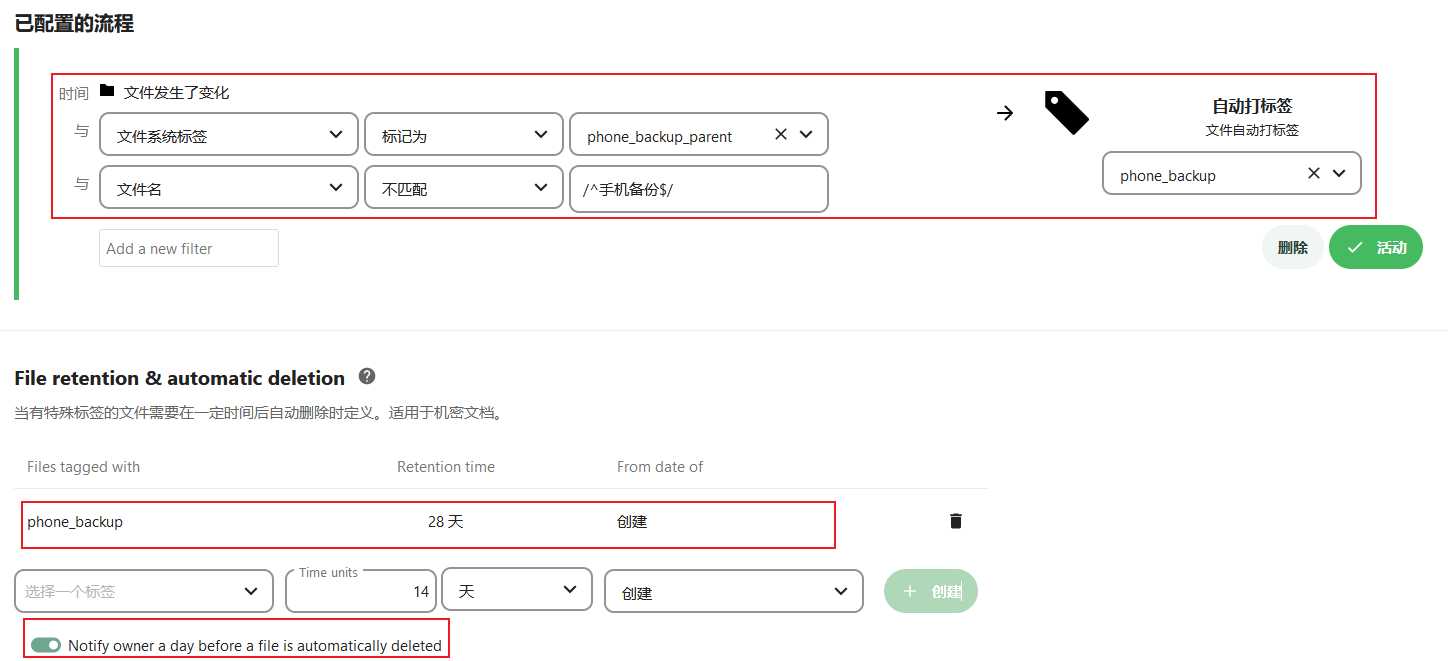
– 手动给要删除文件或文件夹的父目录设置标签,比如给目录手机备份添加标签”phone_backup_parent”
– 点击”管理设置”->”流程”
添加一个自动打标签流程,配置如下:
|条件类型|比较符|值|
|--------|------|-----|
|文件系统标签|标记为|phone_backup_parent|
|文件名|不匹配|/^手机备份$/|

然后动作选择"自动打标签",标签名为“phone_backup”
Views: 83
/etc/fstab中加入
/dev/unitek/backup /mnt/backup ext4 defaults,nofail,x-systemd.device-timeout=15 0 1
默认如果fstab中的磁盘挂载失败会导致系统无法启动,加入nofail,x-systemd.device-timeout=15可以在usb磁盘没有插入时仍能启动系统,15是超时时间,如果15秒后还不能成功挂载磁盘则放弃。
apt install autofs
systemctl enable autofs.service
echo /- /etc/auto.pve >> /etc/auto.master #添加一个直接挂载
echo /mnt/backup    -fstype=ext4,defaults,timeout=0 :/dev/unitek/backup >> /etc/auto.pve # /etc/auto.pve是新建的文件,timeout=0指定不会自动卸载
systemctl restart autofs
Views: 76